By: AY1920S2-CS2103-W15-4 Since: Feb 2020 Licence: MIT
1. Setting up
1.1. Prerequisites
-
JDK
11or above -
IntelliJ IDE
IntelliJ by default has Gradle and JavaFx plugins installed.
Do not disable them. If you have disabled them, go toFile>Settings>Pluginsto re-enable them.
1.2. Setting up the project in your computer
-
Fork this repo, and clone the fork to your computer
-
Open IntelliJ (if you are not in the welcome screen, click
File>Close Projectto close the existing project dialog first) -
Set up the correct JDK version for Gradle
-
Click
Configure>Project Defaults>Project Structure -
Click
New…and find the directory of the JDK
-
-
Click
Import Project -
Locate the
build.gradlefile and select it. ClickOK -
Click
Open as Project -
Click
OKto accept the default settings.
1.3. Verifying the setup
-
Run the
clzzz.helper.Mainand try a few commands -
Run the tests to ensure they all pass.
1.4. Configurations to do before writing code
1.4.1. Configuring the coding style
This project follows oss-generic coding standards. IntelliJ’s default style is mostly compliant with ours but it uses a different import order from ours. To rectify,
-
Go to
File>Settings…(Windows/Linux), orIntelliJ IDEA>Preferences…(macOS) -
Select
Editor>Code Style>Java -
Click on the
Importstab to set the order-
For
Class count to use import with '*'andNames count to use static import with '*': Set to999to prevent IntelliJ from contracting the import statements -
For
Import Layout: The order isimport static all other imports,import java.*,import javax.*,import org.*,import com.*,import all other imports. Add a<blank line>between eachimport
-
1.4.2. Updating documentation to match your fork
After forking the repo, the documentation will still have the SE-EDU branding and refer to the AY1920S2-CS2103-W15-4/main repo.
If you plan to develop this fork as a separate product (i.e. instead of contributing to AY1920S2-CS2103-W15-4/main), you should do the following:
-
Configure the site-wide documentation settings in
build.gradle, such as thesite-name, to suit your own project. -
Replace the URL in the attribute
repoURLinDeveloperGuide.adocandUserGuide.adocwith the URL of your fork.
1.4.3. Setting up CI
Set up Travis to perform Continuous Integration (CI) for your fork.
After setting up Travis, you can optionally set up coverage reporting for your team fork.
| Coverage reporting could be useful for a team repository that hosts the final version but it is not that useful for your personal fork. |
Optionally, you can set up AppVeyor as a second CI.
| Having both Travis and AppVeyor ensures your App works on both Unix-based platforms and Windows-based platforms (Travis is Unix-based and AppVeyor is Windows-based) |
2. Design
2.1. Architecture
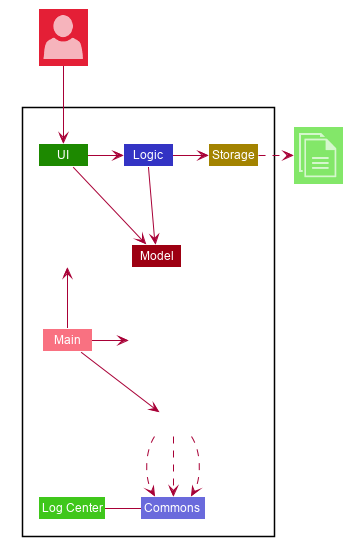
The Architecture Diagram given above explains the high-level design of the App. Given below is a quick overview of each component.
The .puml files used to create diagrams in this document can be found in the diagrams folder at docs/diagrams.
|
Main has two classes called Main and MainApp. It is responsible for,
-
At app launch: Initializes the components in the correct sequence, and connects them up with each other.
-
At shut down: Shuts down the components and invokes cleanup method where necessary.
Commons represents a collection of classes used by multiple other components.
The following class plays an important role at the architecture level:
-
LogsCenter: Used by many classes to write log messages to the App’s log file.
The rest of the App consists of four components.
-
UI: The UI of the App. -
Logic: The command executor. -
Model: Holds the data of the App in-memory. -
Storage: Reads data from, and writes data to, the hard disk.
Each of the four components
-
Defines its API in an
interfacewith the same name as the Component. -
Exposes its functionality using a
{Component Name}Managerclass.
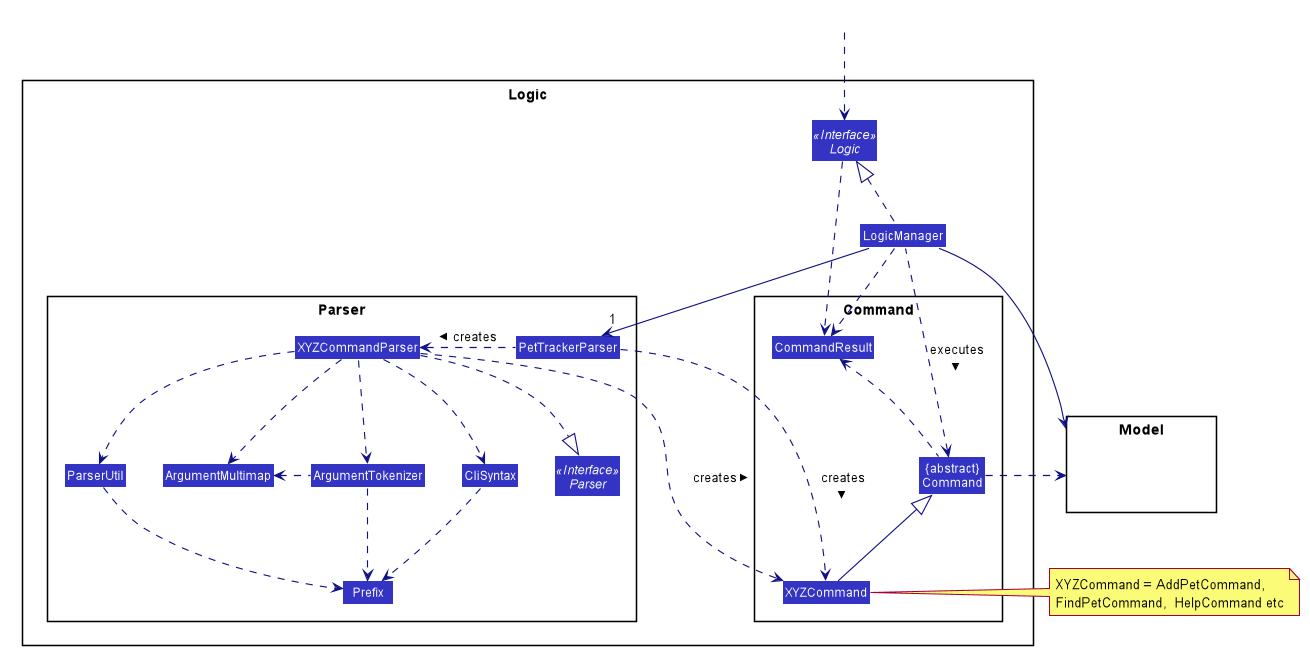
For example, the Logic component (see the class diagram given below) defines it’s API in the Logic.java interface and exposes its functionality using the LogicManager.java class.
How the architecture components interact with each other
The Sequence Diagram below shows how the components interact with each other for the scenario where the user issues the command deletepet 1.
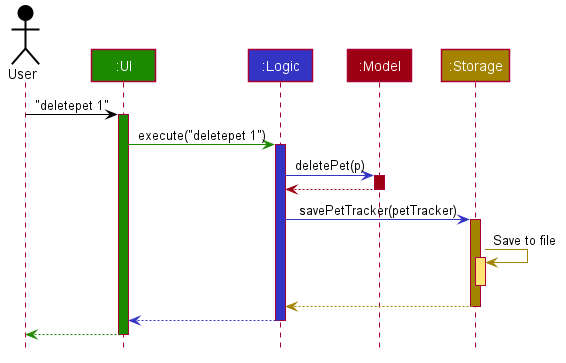
deletepet 1 commandThe sections below give more details of each component.
2.2. UI component
Written by Dylan Lim
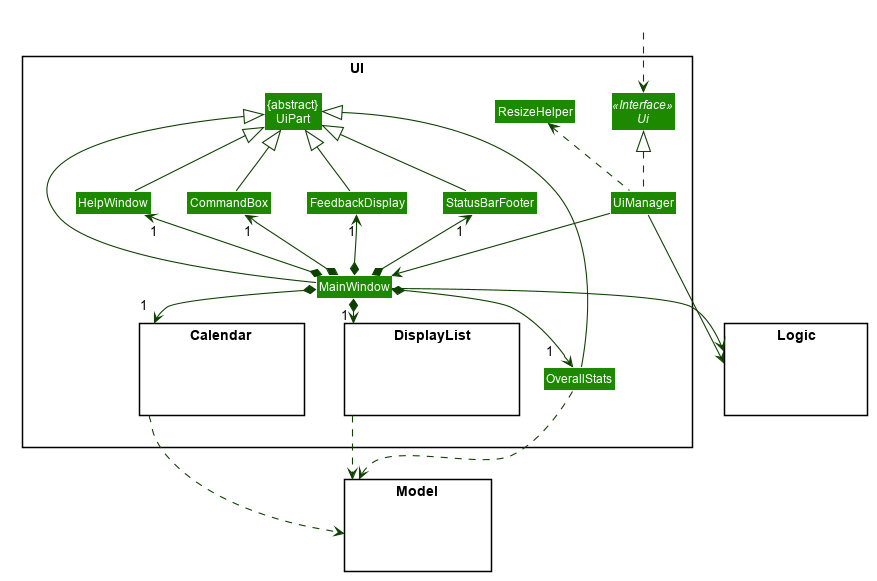

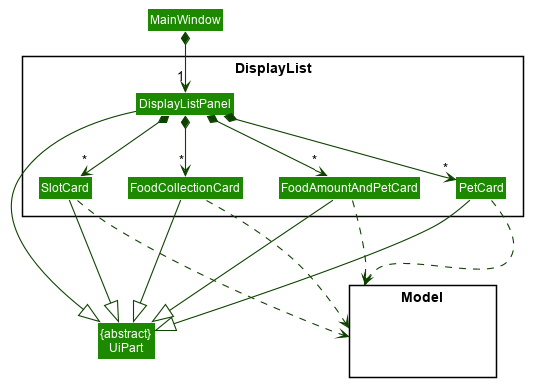
The UI consists of a MainWindow class that is made up of parts which can be classified broadly into 2 groups:
-
(Group 1) Parts that are always displayed at all times, which include
CommandBox,FeedbackDisplay,StatusBarFooter, etc. These parts appear aboveMainWindowin the class diagram for UI. -
(Group 2) Parts that are selectively displayed, depending on the command entered by the user. Only some of these parts will be shown at any one instance. These include the
CalendarandDisplayListcomponents, andOverallStatistics. These parts appear beneathMainWindowin the class diagram for UI.
All the UI classes, including the MainWindow, inherit from the abstract UiPart class.
The UI component uses JavaFx UI framework. The layout of these UI parts are defined in matching .fxml files that are in the src/main/resources/view folder. For example, the layout of the MainWindow is specified in MainWindow.fxml.
In addition, each UI part has been styled using CSS. The custom CSS styling rules are defined in multiple CSS stylesheets, which can be found in the src/main/resources/view/stylesheets folder.
The UI component does the following:
-
Executes user commands using the
Logiccomponent. -
Listens for changes to
Modeldata to update the UI with the modified data. -
Handles a returned
CommandResultto perform additional actions, e.g. show the help window, exit the program, display the appropriate part or component from Group 2, etc.
2.3. Logic component
-
Logicuses thePetTrackerParserclass to parse the user command. -
This results in a
Commandobject which is executed by theLogicManager. -
The command execution can affect the
Model(e.g. adding a pet). -
The result of the command execution is encapsulated as a
CommandResultobject which is passed back to theUi. -
In addition, the
CommandResultobject can also instruct theUito perform certain actions, such as displaying help to the user.
Given below is the Sequence Diagram for interactions within the Logic component for the execute("deletepet 1") API call.
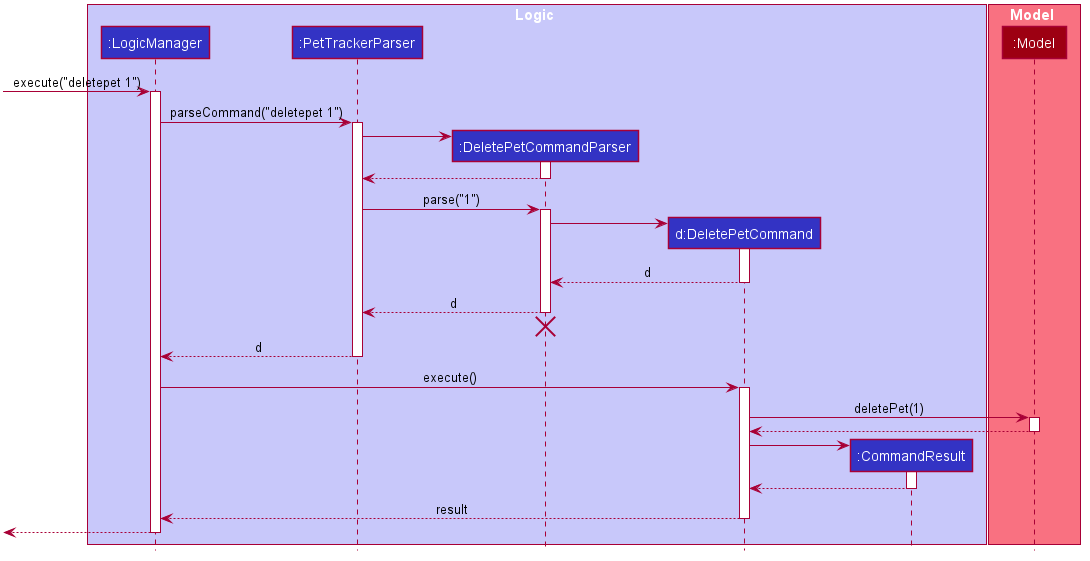
deletepet 1 Command
The lifeline for DeletePetCommandParser should end at the destroy marker (X) but due to a limitation of PlantUML, the lifeline reaches the end of diagram.
|
Written by Zhu Ruicong
2.4. Model component
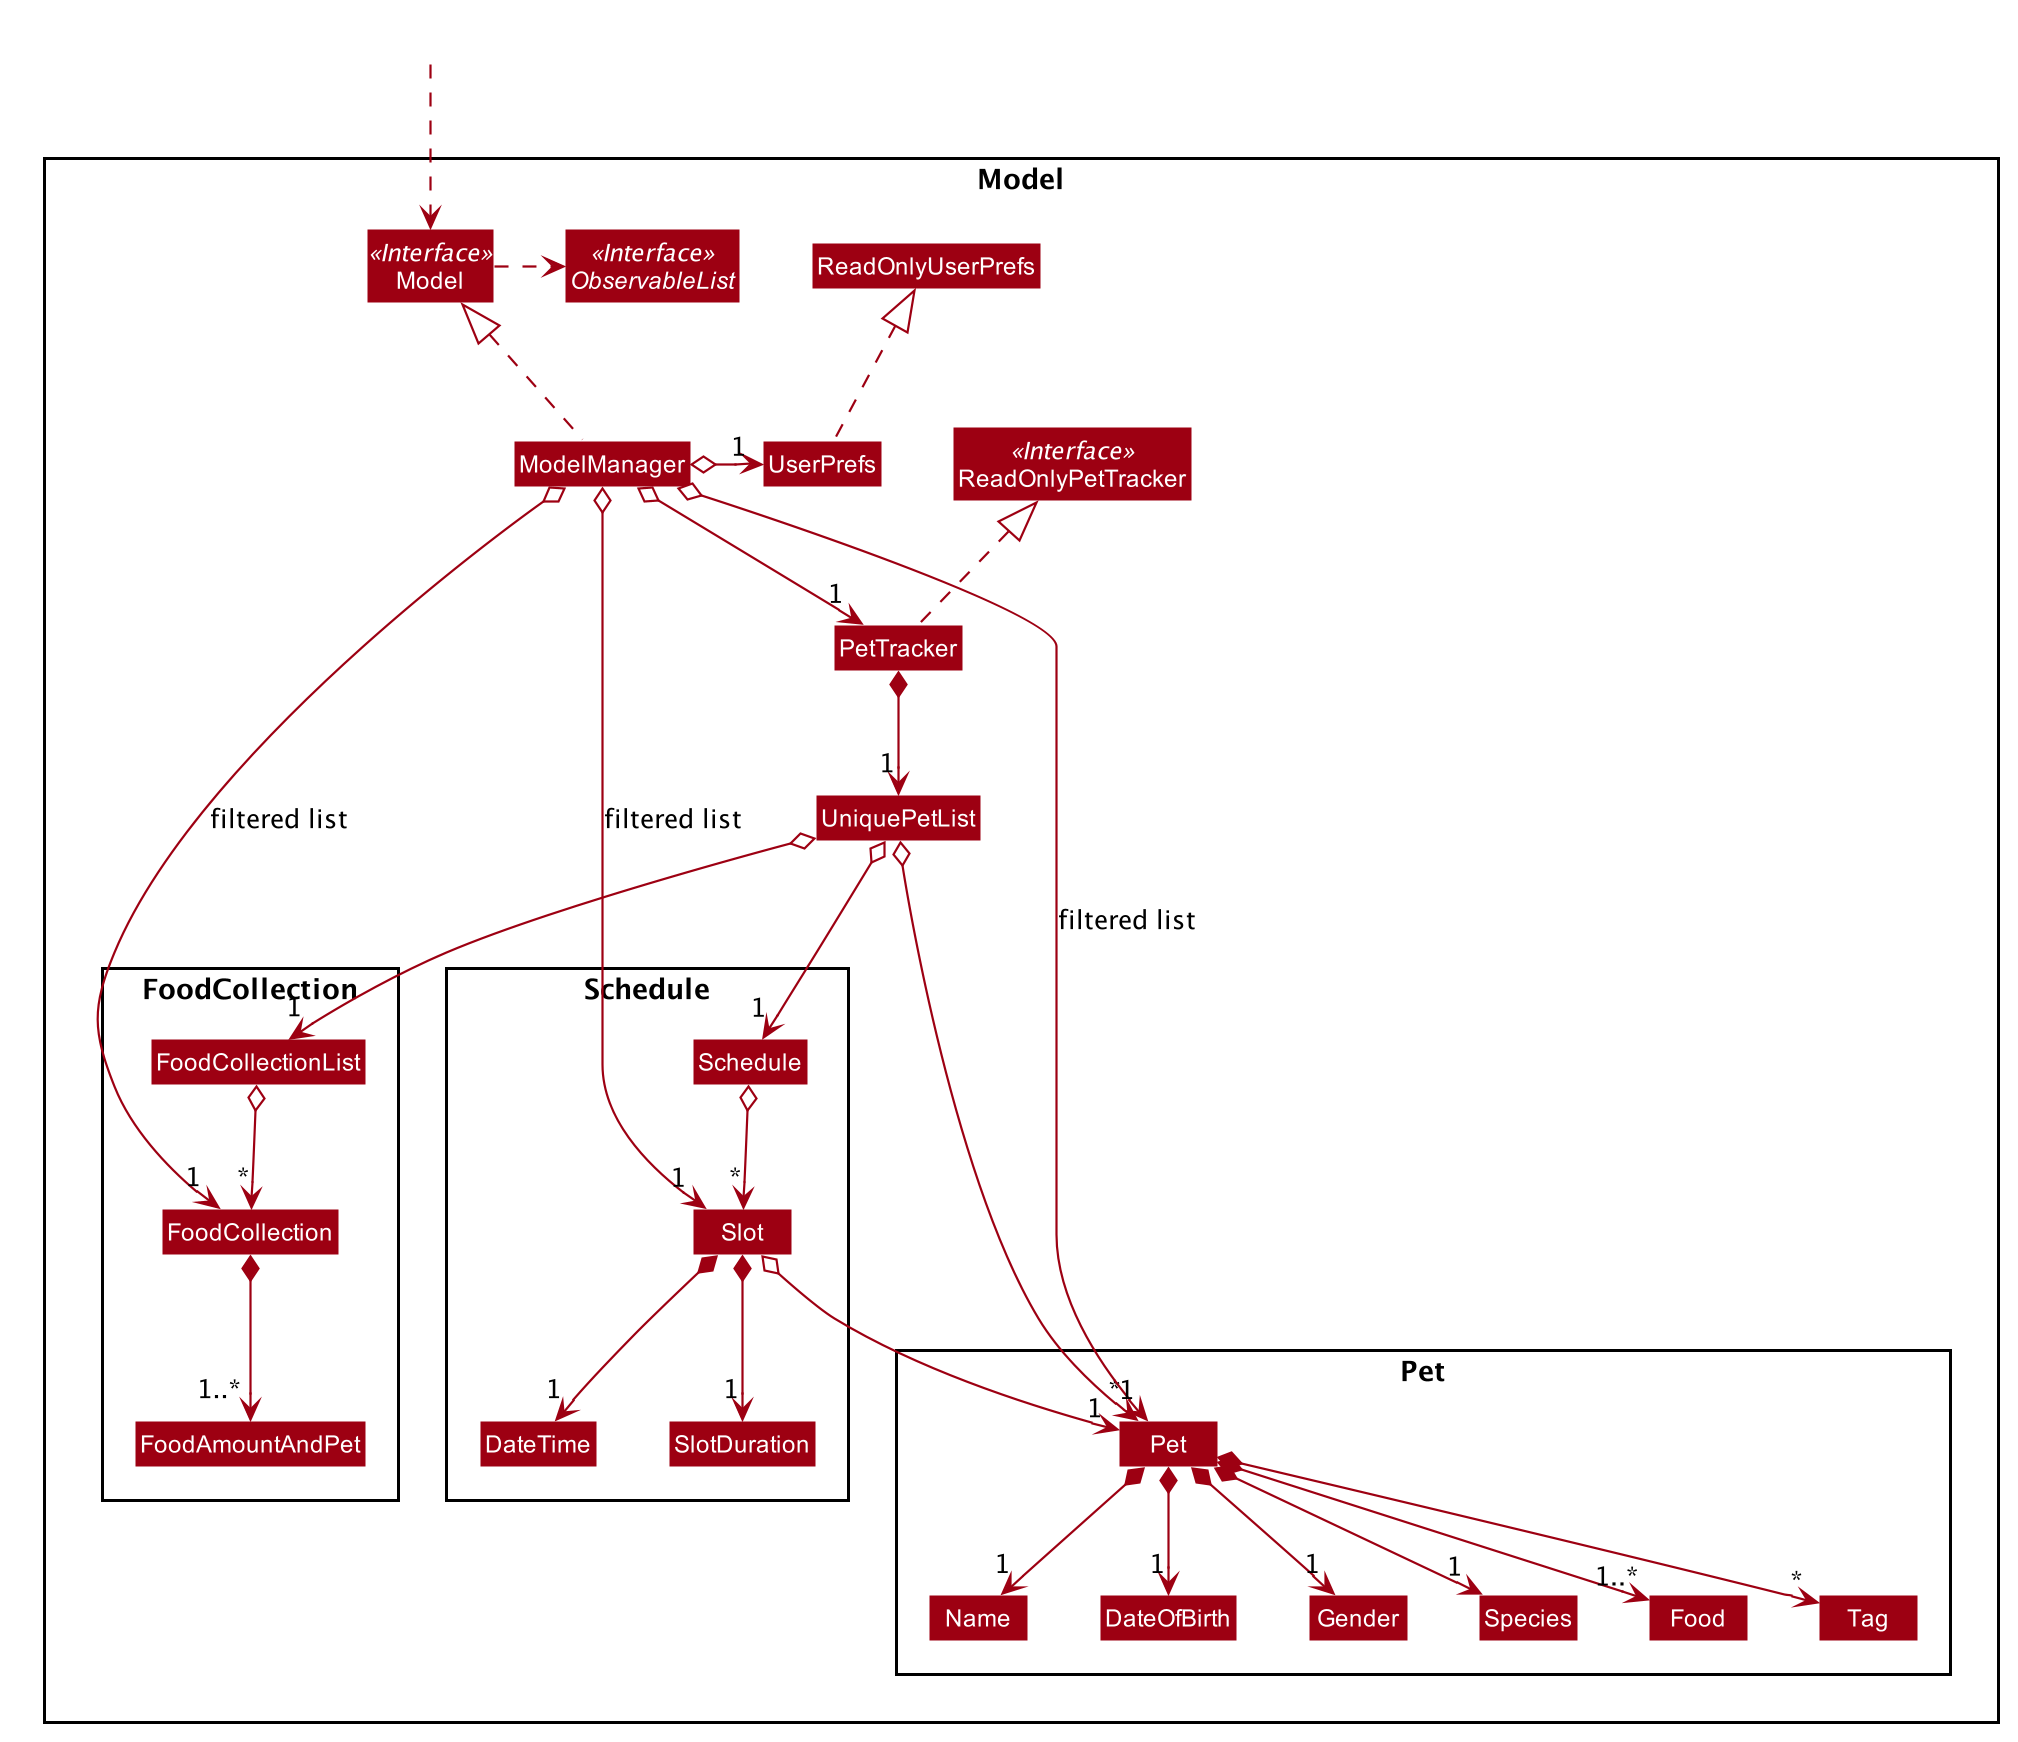
The Model,
-
stores a
UserPrefobject that represents the user’s preferences. -
stores the Pet Store Helper data. Note that the Pet Tracker keeps track of a UniquePetList, which in turn maintains the Pet system, Schedule system and Inventory(FoodCollection) system.
-
exposes an
ObservableList<Pet>, anObservableList<Slot>, and anObservableList<FoodCollection>that are unmodifiable and can be 'observed' e.g. the UI can be bound to this list so that the UI automatically updates when the data in the list change. -
does not depend on any of the other three components.
2.5. Storage component
Written by Chen Shenghao
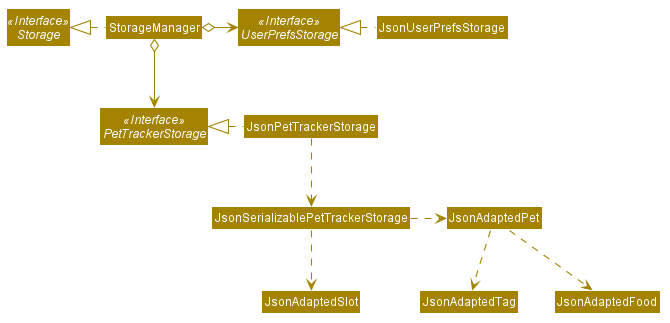
The Storage component,
-
can save
UserPrefobjects in json format and read it back. -
can save the Pet Tracker data in json format and read it back.
2.6. Common classes
Classes used by multiple components are in the seedu.address.commons package.
3. Implementation
This section describes some noteworthy details on how certain features are implemented.
3.1. Display switching feature
Written by Dylan Lim
3.1.1. Implementation
The display mechanism is facilitated by an ObservableList of DisplayItem s called filteredDisplayItems, which is an attribute stored in ModelManager.
Any class that is to be displayed as an item in a list implements the DisplayItem interface. This interface has a single method named getDisplaySystemType which returns the type of system to be displayed. In our program, the Pet, Slot, FoodCollection, and FoodAmountAndPet classes implement this interface.
Given below is an example usage scenario and how the display mechanism behaves at each step.
Step 1. The user opens the app the the 1st time. A few things happen at start-up:
-
In
Model(ModelManager),filteredDisplayItemsis created, and is set to bind tofilteredPets. This way,filteredDisplayItemscontains all the elements offilteredPets, and any changes tofilteredPetswill also be automatically propogated tofilteredDisplayItems. -
In the
MainWindow, aDisplayListPaneland aCalendarPanelare initialized. TheDisplayListPanelis created withfilteredDisplayItemsas its backing list, while theCalendarPanelwill be initialized with theListofSlots obtained fromlogic.getPetTracker().getSlotList(). -
The
resultDisplayPlaceholdercomponent in theMainWindowis set to display theDisplayListPanel. As such, the user sees the list of pets as the initial display.
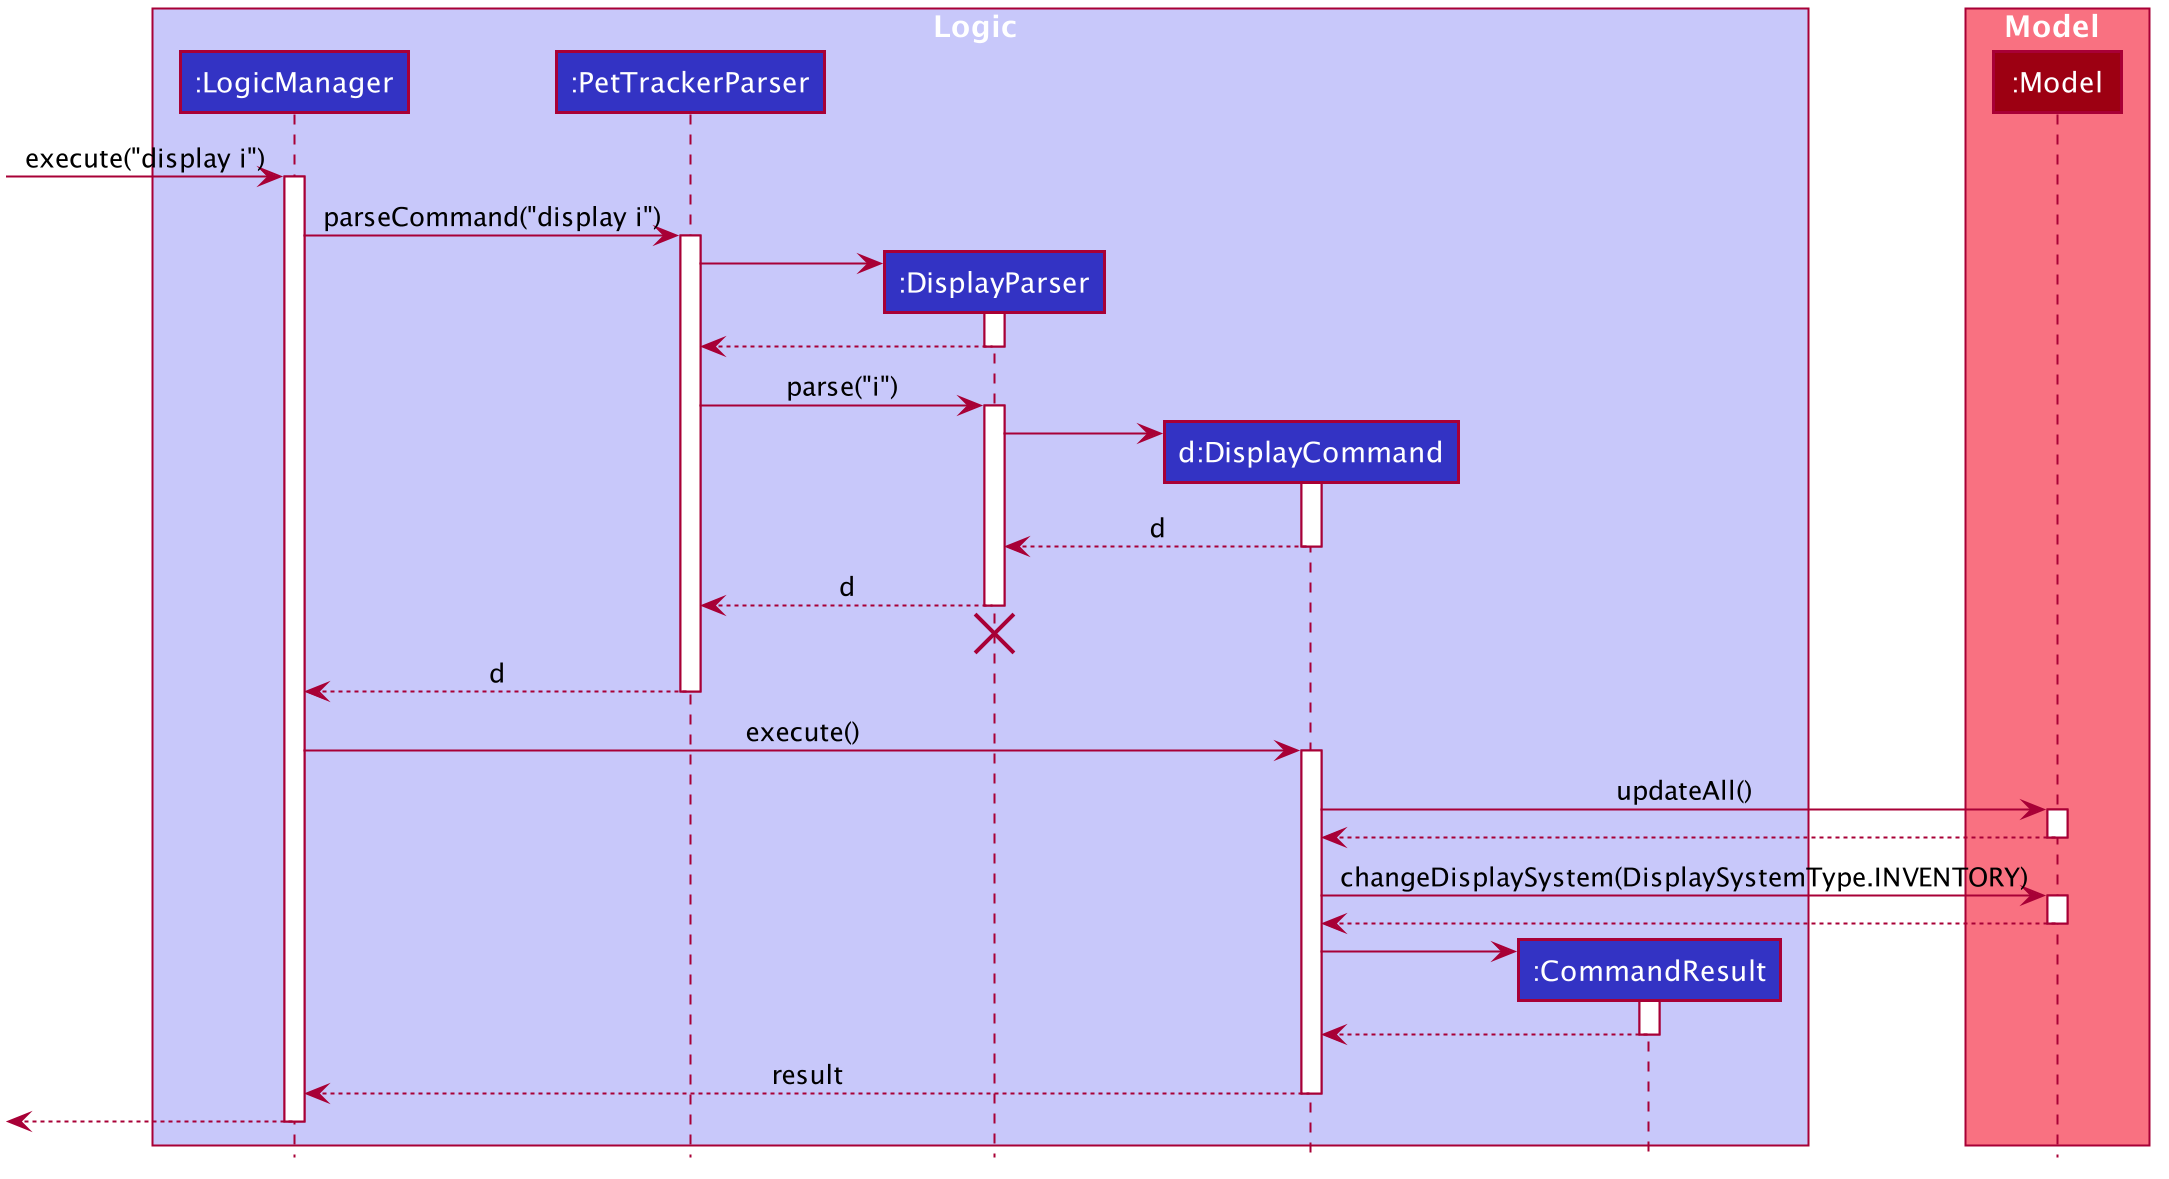
Step 2. The user executes display c to have the slots displayed in calendar view. Since filteredDisplayItems is not used for displaying the calendar, it is not changed when the display command calls Model#changeDisplaySystem. Upon receiving back the result of the command in MainWindow, resultDisplayPlaceholder is changed to display the CalendarPanel instead of the DisplayListPanel.
The following sequence diagrams shows how the display is switched to calendar:
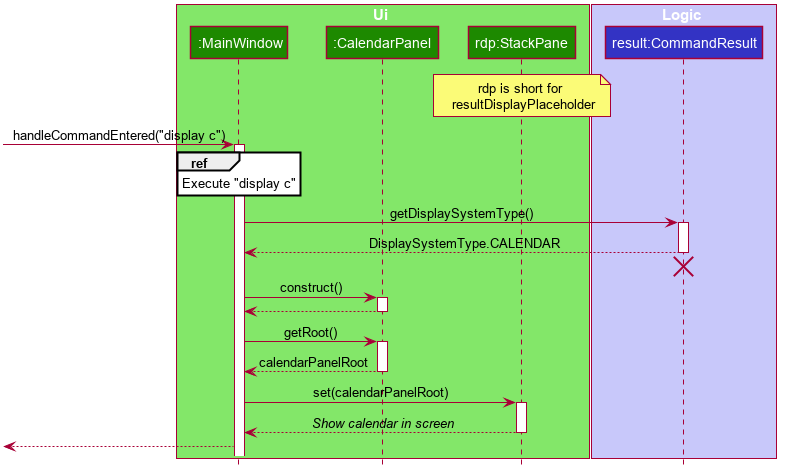

The lifeline for CommandResult, DisplayParser, and DisplayCommand should end at the destroy marker (X) but due to a limitation of PlantUML, the lifeline reaches the end of diagram.
|
Step 3. The user executes display s to have the slots displayed in a list. The display command calls Model#changeDisplaySystem, which causes filteredDisplayItems to re-binded to filteredSlots. Since the program should now display a list of items instead of a calendar, upon receiving back the result of the command in MainWindow, resultDisplayPlaceholder is changed to display the DisplayListPanel from CalendarPanel.
The following sequence diagrams shows how the display is switched to slots list view:

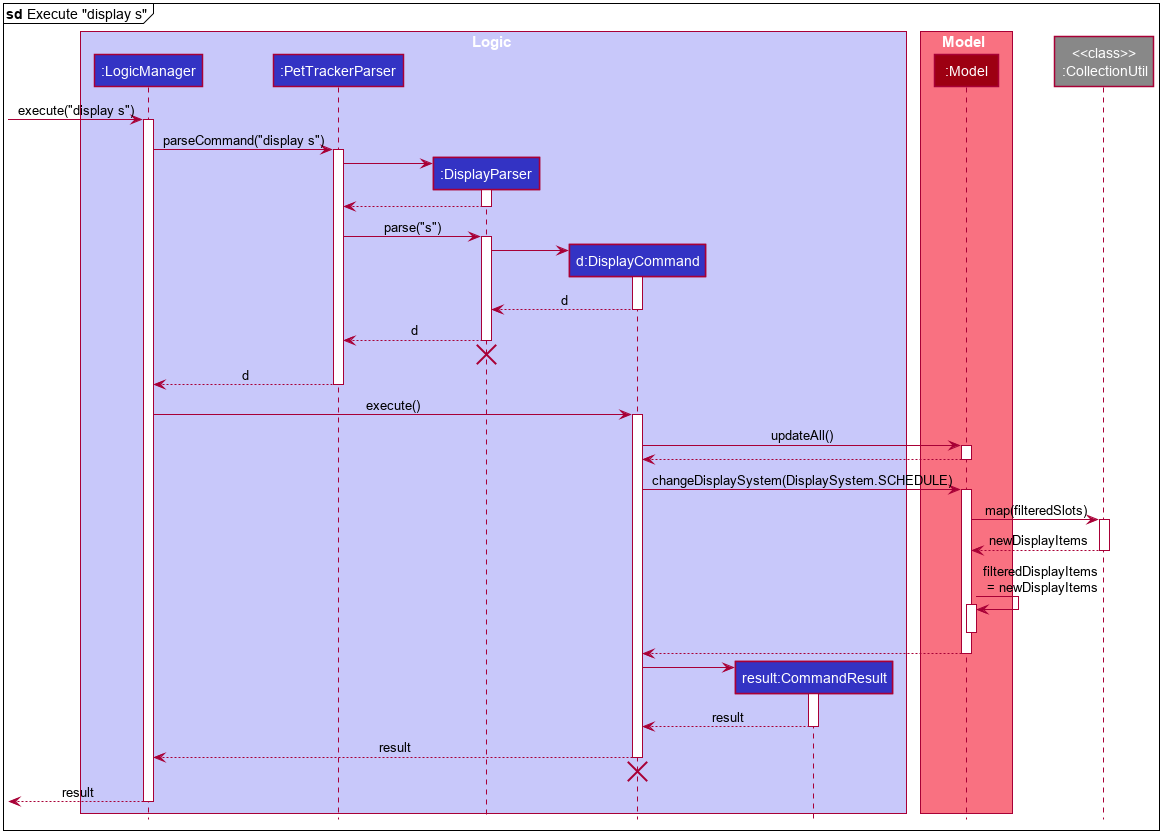
The lifeline for CommandResult, DisplayParser, and DisplayCommand should end at the destroy marker (X) but due to a limitation of PlantUML, the lifeline reaches the end of diagram.
|
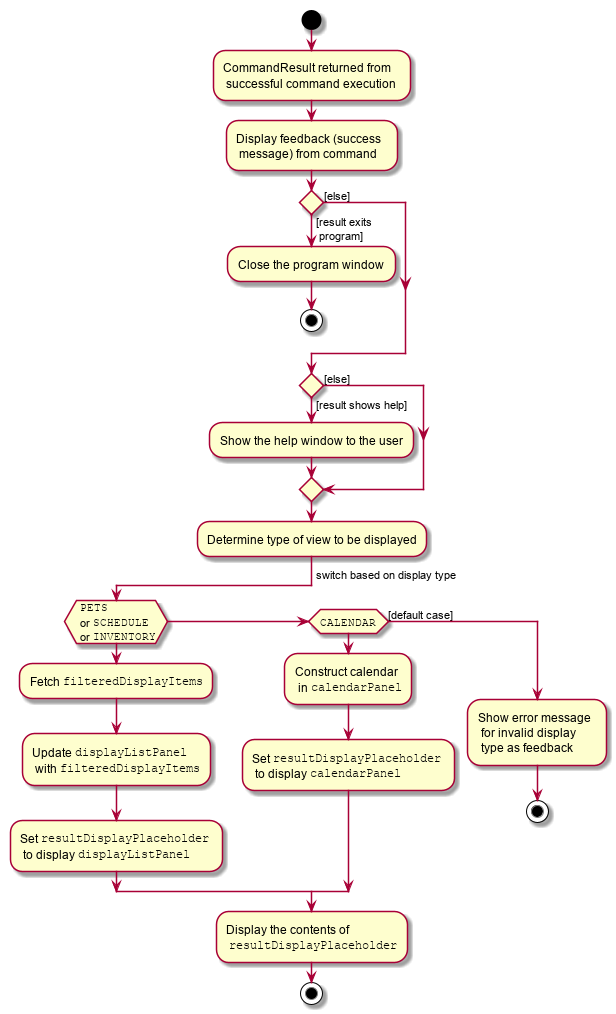
The following activity diagram summarizes what happens in MainWindow#executeCommand upon the return of a command result:
3.2. Schedule feature
Written by Zhao Mingjian
3.2.1. Implementation
The schedule feature uses instances of class Slot to organise bathing schedule for the pets. Each Slot contains a
starting time of the bath, stored internally as a LocalDateTime, and the duration of the bath stored internally as a
Duration. It stores a reference to the Pet in the ModelManager as specified by the user.
Given below is an example usage scenario and how the Schedule mechanism behaves at each step.
Step 1. The user launches the application with some pets stored (Garfield, for instance). ObservableList<Slot>
in Schedule is currently empty.
Step 2. The user executes addslot n/Garfield t/1/4/2020 1200 d/120 command to create a Slot for Garfield.
The AddSlotCommandParser calls parsePet() in SlotParserUtil, which then takes in the Model passed in to find a
reference for the specific Pet with Model.getPet(). Prior to this stage, if the name string is invalid, a
ParseException(MESSAGE_INVALID_PETNAME) will be thrown. Or the program cannot find the Pet in the model, a
ParseException(MESSAGE_PET_DOES_NOT_EXIST) will be thrown. This ensures that every slot created actually points to an
existing Pet found in PetTracker.
If parsePet() fails its execution, no new Slot is created.
|
Step 3. New Slot is created.
Step 4. The user now decides that this exact slot should be occupied by another pet, and decides to edit it, executing
the editslot command.
Step 5. SlotParserUtil is used again to create a reference to a pet in the ModelManager.
Step 6. The user now decides that they need to see slots occupied by a particular pet on a particular date, executing
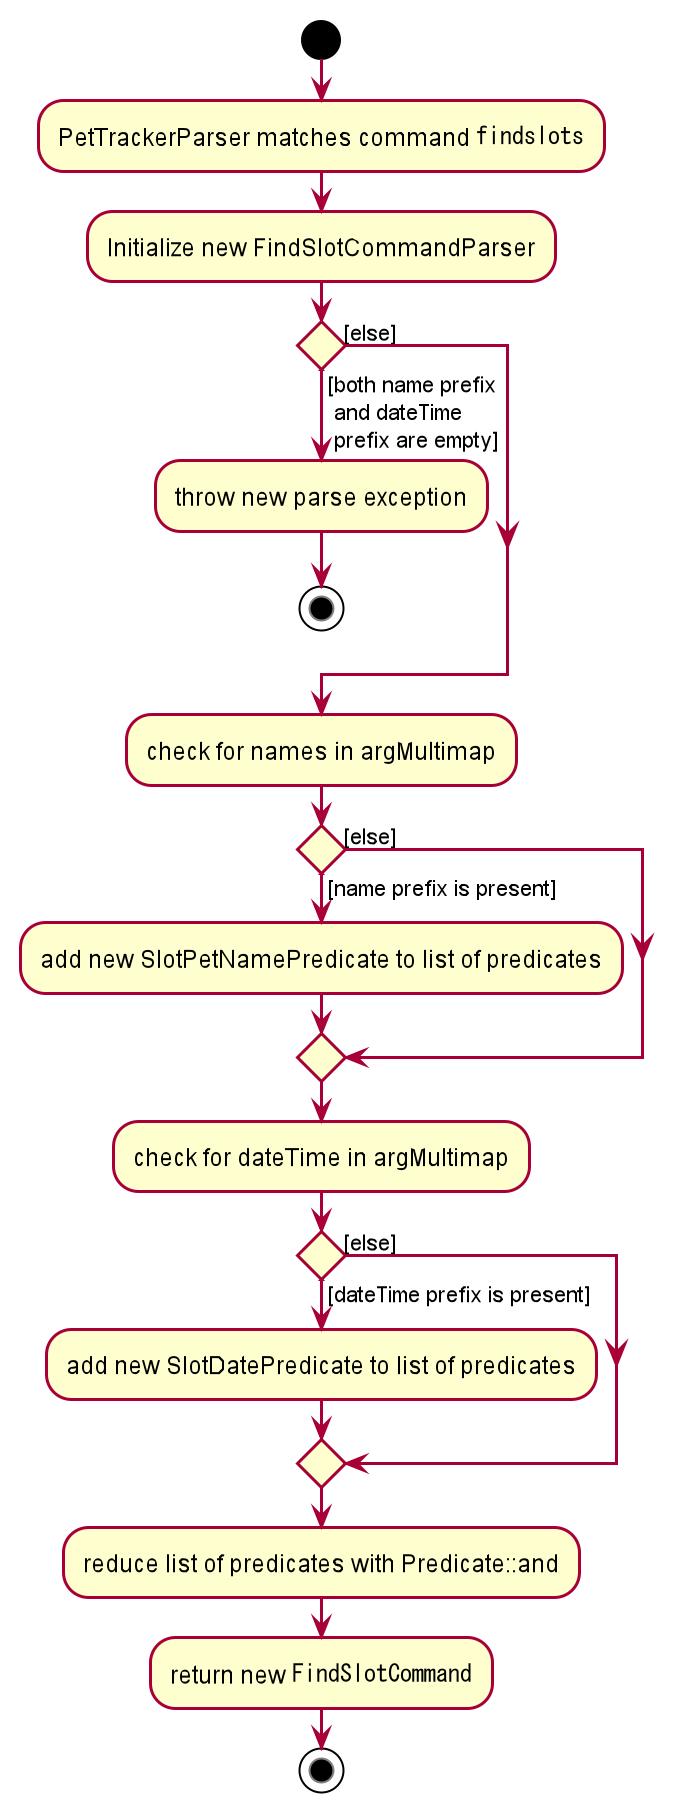
the findslots n/Garfield t/1/4/2020 command.
Step 7. The FindSlotCommand reduces the two predicates* and pass it to ModelManager to create a filtered list of
slots.
*The FindSlotCommand uses the following classes which both inherit Predicate<Slot> to search for the user specified
slots:
-
SlotPetNamePredicate()— Internally stores theNameto search for, and compares it withgetPet().getName().fullName. -
SlotDateTimePredicate()— Internally stores theLocalDateTimeto search for (Timing will be ignored), and compares it withgetDate().
The activity diagram below is an illustration of the flow of events that happen in the model component when the steps above occurs.
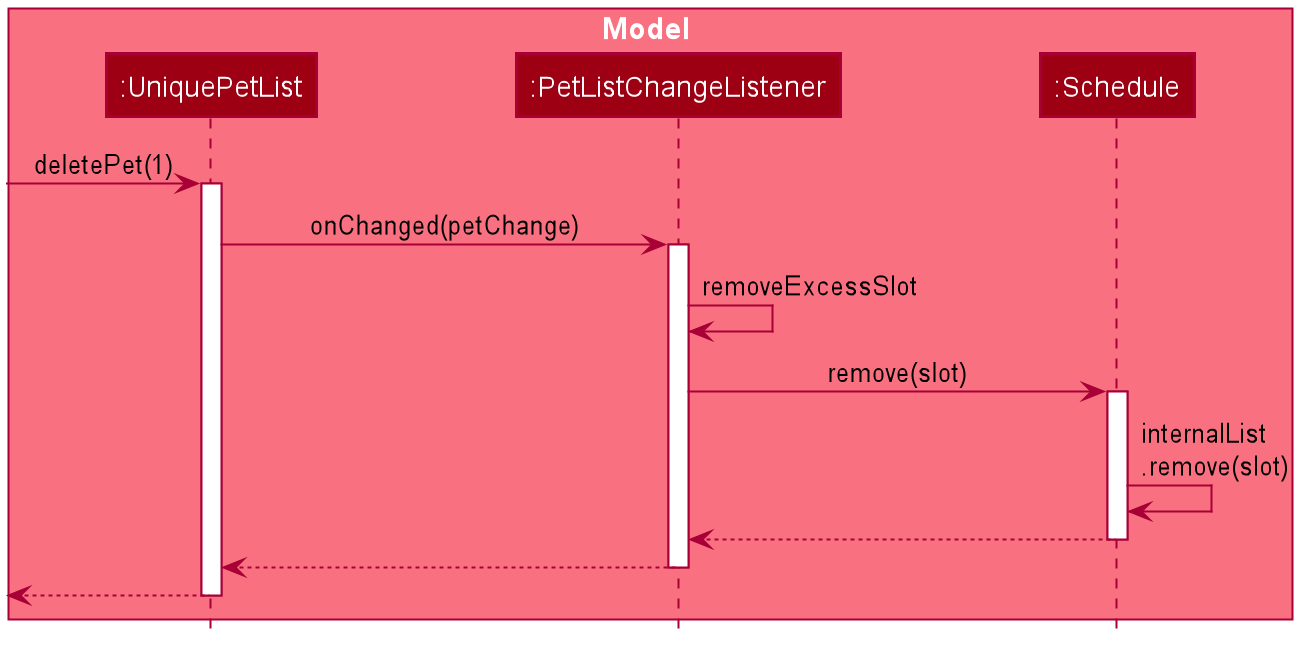
Given below is an example usage scenario that demonstrates how the Schedule system integrates with the Pet system.
Step 1. The user launches the application with a pet stored: Garfield. A single instance of Slot occupies
ObservableList<Slot> in Schedule, whose parameters are: petName: Garfield,
dateTime: 11/4/2020 1200, duration: 40. Upon launch, a PetListChangeListener will be attached to internalList of
UniquePetList.
Step 2. The user executes deletepet 1 command to delete Garfield from the UniquePetList. When user deletes the pet,
function onChanged in PetListChangeListener is called. This function calls removeExcessSlot within the
PetListChangeListener for each pet removed.
Step 3. removeExcessSlot calls remove in Schedule to remove slots based on the name of the removed pet.
Step 4. The user now have successfully removed Garfield and all the slots the pet used to occupy.
The sequence diagram below is an illustration of the flow of events that happen in the model component when the steps above occurs.
3.2.2. Design Considerations
Aspect: How schedule stores the pets internally
-
Alternative 1 (current choice): Makes a reference to the the memory address in
ModelManager.-
Pros: When the pet is edited, it is easier to update the corresponding slot. Also reduces save file size and conserve system memory as there will be no duplicate information.
-
Cons: Harder to implement and test. Testing requires a sample list of pets to be instantiated first.
-
-
Alternative 2: Simply create a new Pet.
-
Pros: Easy to implement and test (A refactor of
Pet), low coupling withModel. -
Cons: Harder to synchronize with any changes in
UniquePetList
-
3.3. Calendar feature
Written by Dylan Lim
3.3.1. Implementation
The class diagram for calendar-related components, as shown in Figure 5, “Structure of the Calendar Component in UI” previously, is reproduced in this section for convenience.
The construction of the calendar is accomplished by the construct() method in CalendarPanel. Based on the list of all slots in the system, it determines which type of CalendarRegion is to be placed at which position of the GridPane in CalendarPanel.
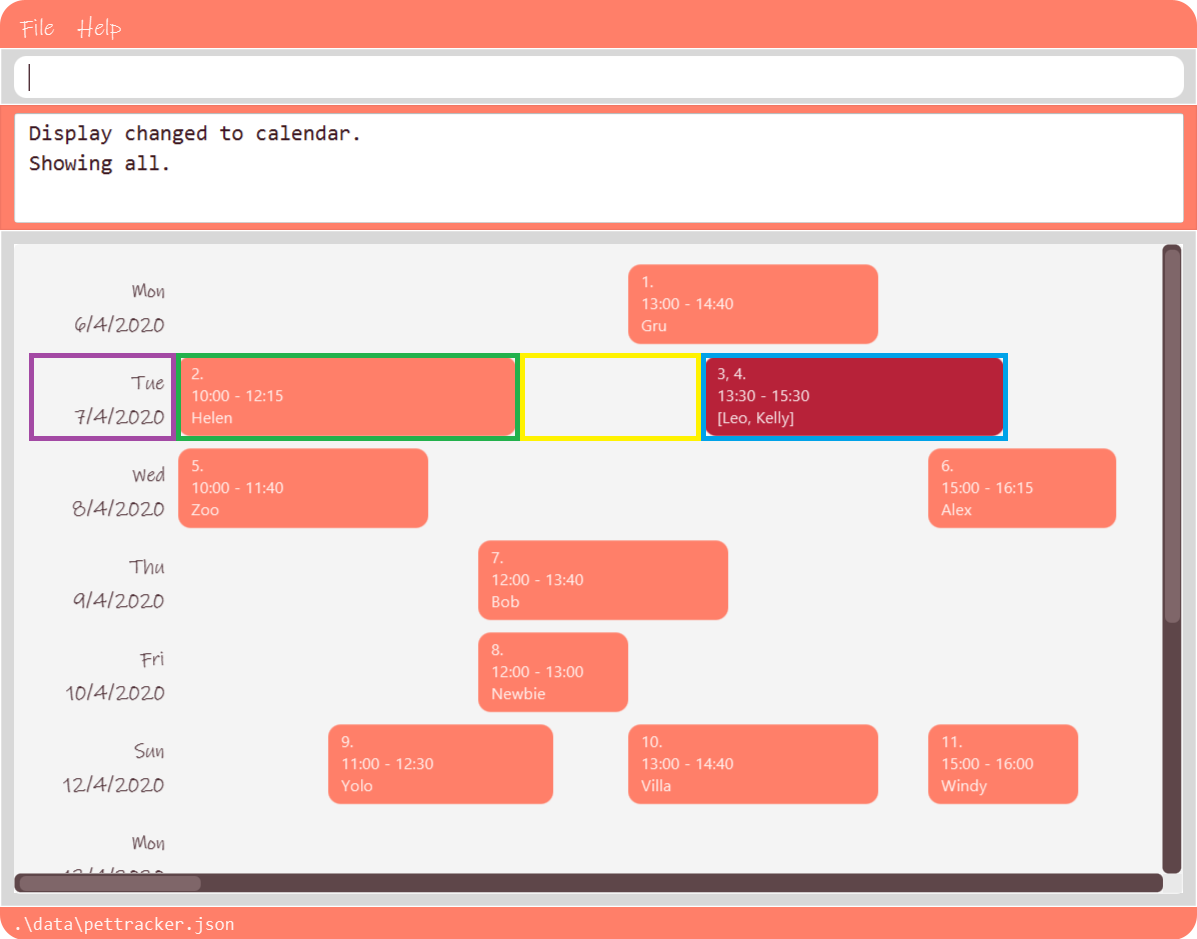
CalendarRegion s marked outIn tha above annotated screenshot, rectangles with the following border color correspond to the following CalendarRegion (from left to right, on 7/4/2020):
-
Purple:
CalendarDate. It is used to display the day and date of slots in the same row, and it always positioned to the left. -
Green:
CalendarSlot. It constitutes a single slot. -
Yellow:
CalendarBuffer. It acts a buffer between other regions, for padding purposes. -
Blue:
CalendarConflict. It represents a region of more than two or more conflicted slots.
The following activity diagram outlines the rough flow of calendarPanel#construct:
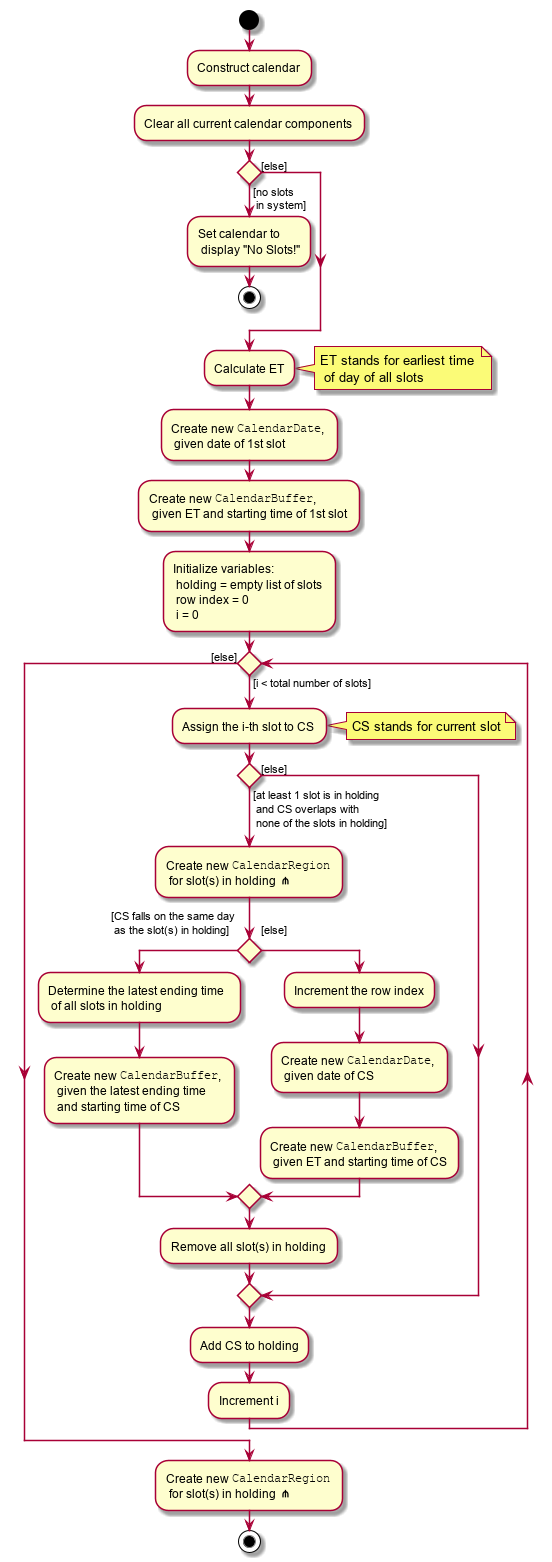
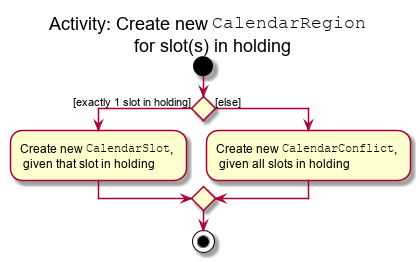
CalendarRegion for slot(s) in holding.CalendarRegion s are created sequentially, from left to right (increasing time of day), then top to bottom (increasing date). Each time a CalendarRegion is created, it is placed onto a GridPane based on the row index, and its starting time.
3.3.2. Design Considerations
Aspect: Construction of calendar upon addition / deletion / edition of slot(s)
-
Alternative 1 (current choice): Clear all components in
CalendarPaneland redraw everything.-
Pros: Relatively simpler to implement.
-
Cons: Might take a long time to draw if system has many slots.
-
-
Alternative 2: Modify only the component that is related the affected slot.
-
Pros: Better performance.
-
Cons: More complex implementation needed to determine and resolve conflicts, if any.
-
3.4. Inventory feature
Written by Zhu Ruicong
3.4.1. Implementation
The Inventory feature gives a summary of all the food items involved in a pet tracker system.
It is supported by FoodCollection which resembles a collection of food of the same type and FoodCollectionList which is a list of these collections.
A FoodCollectionList is stored as an attribute of UniquePetList for the following reasons:
-
The list of
FoodCollectionitems associated with aUniquePetListcan be directly derived from theUniquePetListitself. -
Changes in FoodCollection occurs only if there is a change in
UniquePetList#internalList.
Data stored in FoodCollectionList is exposed to ModelManager through UniquePetList and PetTracker as an unmodifiable ObservableList<FoodCollection>.
ModelManager then passes the list of FoodCollection to UI for display as a list of DisplayItem when display i is called.
The following shows a typical usage scenario that involves the Display Inventory feature.
-
Step 1: The user launches the application. A
UniquePetListis initialized inPetTracker, upon which aFoodCollectionListitem is created to store the food data of the pets in the list(if it is an empty list,FoodCollectionListis also stores an empty list ofFoodCollection) -
Step 2: The user executes 'display i' command. The
displaycommand calls Model#ChangeDisplaySystem() and theidisplay type determines the displayed list is switched toObservableList<FoodCollection>.Model#getFilteredDisplayList()then acquires the list and sends it to Ui unit for display. -
Step 3: The user inputs a command that modifies the
UniquePetList, e.g 'editpet 1 f/catfood:100'.UniquePetList#internalListis an instance ofObservableList<Pet>. Thus when it is modified, aListChangeListener<Pet>is woken up and it callsUniquePetList#updateFoodCollectionList()to update theFoodCollectionListaccording to the modified Pet list.
The sequence diagram below is an illustration of the flow of events that happen in the logical component when Step 2 above occurs.
display i CommandNote that there is no explicit initialization or update for FoodCollection in FoodCollectionList. FoodCollectionList is synchronized to the list of pet(UniquePetList#internalList) in the UniquePetList through ListChangeListener<Pet>, which is triggered whenever there is a change in the pet list. The sequence diagram below and the steps illustrates this process:
-
Step 1:
UniquePetListpasses itsinternalList(referred to aspetListin the sequence diagram below). -
Step 2:
FoodCollectionListcreates a newFoodCollectionListobjecttempand extractstemp#internalList. -
Step 3: Replaces the content in the current
internalListwith the content in the extractedtemp#internalist.
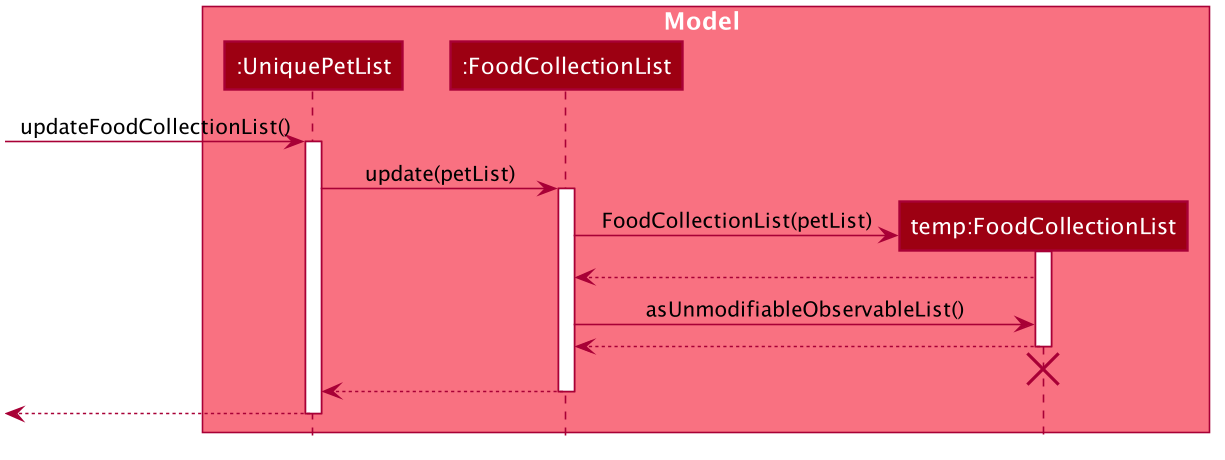
ListChangeListener<Pet> is triggered3.4.2. Design Considerations
Aspect: Maintaining the collection of food in a pet tracker
-
Alternative 1(current choice): Maintains the list as an attribute of
UniquePetList.-
Pros: Easier to initialize and update the list.
-
Cons: Less extendability. Adding additional food items in inventory(independent of pet list) is difficult.
-
-
Alternative 2: Maintains a list of food collections separate from
UniquePetList.-
Pros: Higher Extendability that supports more independent operations of FoodCollection List.
-
Cons: More difficult to constantly update and maintain the food collection list should food list changes.
-
Aspect: Updating the collection of food when pet list is modified.
-
Alternative 1(current choice): Replace the entire list by a new food collection list created from the updated pet list.
-
Pros: Easy to implement and no adaptation is required for different types of modification of pet list.
-
Cons: Computationally intensive when there is a huge pet list.
-
-
Alternative 2: Modify
FoodCollectionaffected by the command.-
Pros: Less computationally intensive and more responsive given a large database.
-
Cons: Adaptations for each pet related commands is required since the food list can be affected in different ways.(e.g addition, modification, deletion)
-
3.5. Conflict feature
Written by Zhao Tianqi
3.5.1. Implementation
The conflict feature shows a list of all slots that has overlapping time period.
-
It makes uses of
SlotConflictPredicatewhich implementsSlotPredicateto filter slots that has a conflicting timing with some other slots. -
If the screen is displaying shortlisted slots,
conflicsonly shows slots with conflicts among the shortlisted list. Otherwise, it shows conflicts in the full slot list -
The command automatically switch display to slots.
Below is a scenario of using conflicts command:
-
Step 1: The user inputs "conflicts" in the command line. The Logic component processes the input and creates a new instance of
ConflictCommand -
Step 2: The
ConflictCommandaccessfilteredSlotsinModel, and create a new instance ofSlotConflictPredicatewithfilteredSlots. -
Step 3:
Modelfilters slots that is conflicting among thefilteredSlotsusing theSlotConflictPredicate. -
Step 4:
ConflictCommandchangescurrentDisplaySystemTypeinModeltoDisplaySystemType.SCHEDULEsuch that the window will display shortlisted conflicting slots.
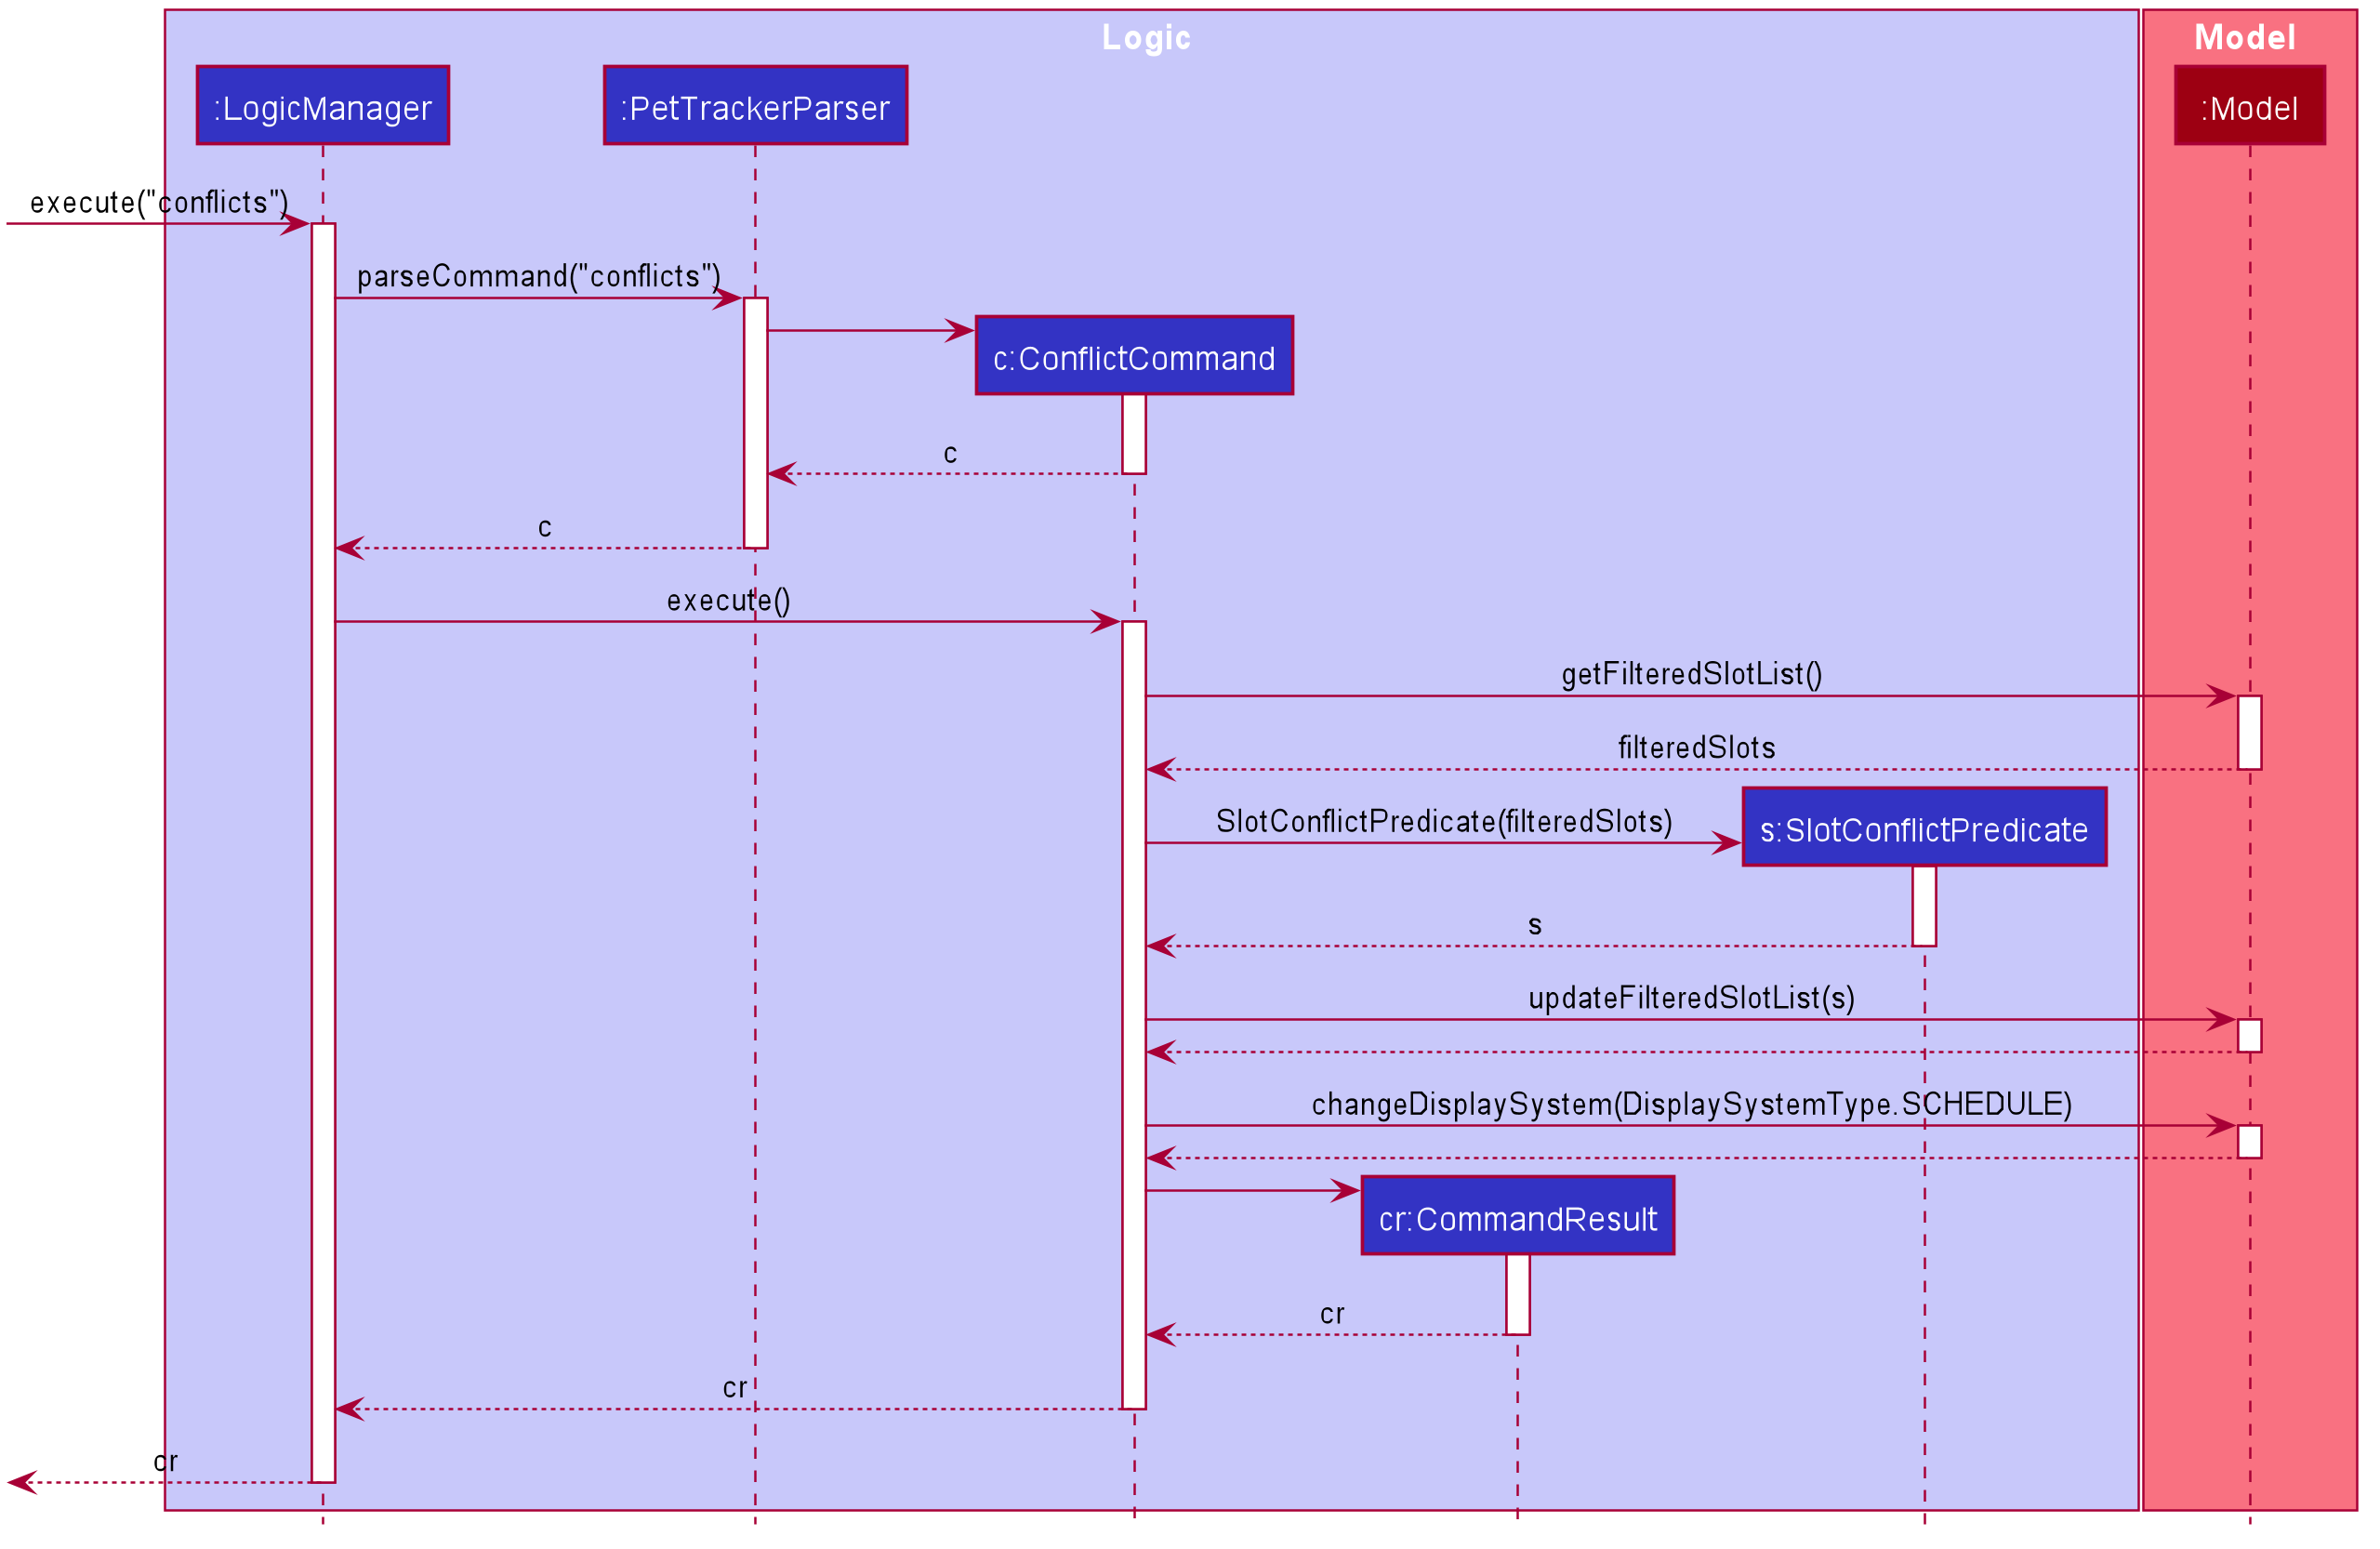
conflicts Command3.5.2. Design Considerations
Aspect: Data structure to store slots and method of checking for conflicts:
-
Alternative 1 (current choice): Store slots in a list, with pairwise comparison between elements to find out conflicts
-
Pros: More straightforward in implementation
-
Cons: The performance might not be scalable. Algorithm does not minimize the computation time.
-
-
Alternative 2: Store slots in an interval tree
-
Pros: Searching for conflicting slots takes less time. The algorithm is more efficient.
-
Cons: Implementation of the data structure needs relatively high level of commitment.
-
3.6. Statistics
Written by Zhao Tianqi
3.6.1. Implementation
We are generating the overall statistics of Pet Store Helper and translate the data in a user-friendly manner.
-
OverallStatsunder UI component handles the translation of three sets of data: list of pets, schedule, and list of inventory. -
Data in
OverallStatsis obtained fromLogic. -
The statistics displayed will automatically update if there is a change in any related information.
How we implemented overall statistic on UI:
-
The statistics for pets are shown in a form of pie chart, while the pets are grouped according to their species.
-
The schedule statistics is in the form of a timetable of recent 3 days. Each slot is represented as a shaded rectangle in the timetable.
-
The inventory data are generated from the list of pets, and grouped together by their names, such that users have a better understanding of overall food consumption. The list of inventory is represented as a bar chart.
Here is the process of how the overall statistics is displayed to the user:
-
Step 1: The user key in the command 'stats', then the Logic component processes the input and creates an instance of
StatsCommand. TheStatsCommandfirst callsModel#updateAll()to make sure that the model will updatefilteredPets,filteredSlots, andfilteredFoodCollectionsto show the full list ofPet,SlotandFoodCollectionin thePetTracker. After that, theStatsCommandcallsModel#changeDisplaySystem(DisplaySystemType.STATISTICS) such that the application will later switch the window to showOverallStats. In the Ui component, there is a new instance ofOverallStatscreated, whileModel#getFilteredPets,Model#getFilteredSlots, andModel#getFilteredFoodCollectionsare passed in the instance for processing.OverallStatsthen generates diagrams according to the data passes in. -
Step 2: The user inputs a command that modifies the UniquePetList, e.g 'editpet 1 s/cat'. The
CommandResultof anyEditPetCommandhastypewithDisplaySystemType.NO_CHANGE. The Ui component identifies thetypein theCommandResultand then refresh the window if it isNO_CHANGE. In this case, the window will refresh and create another new instance ofOverallStatswith the updated list of pets. Therefore the window always shows statistics of the most updated list of pets, slots and food collections.
Following is the sequential diagram of the command stats
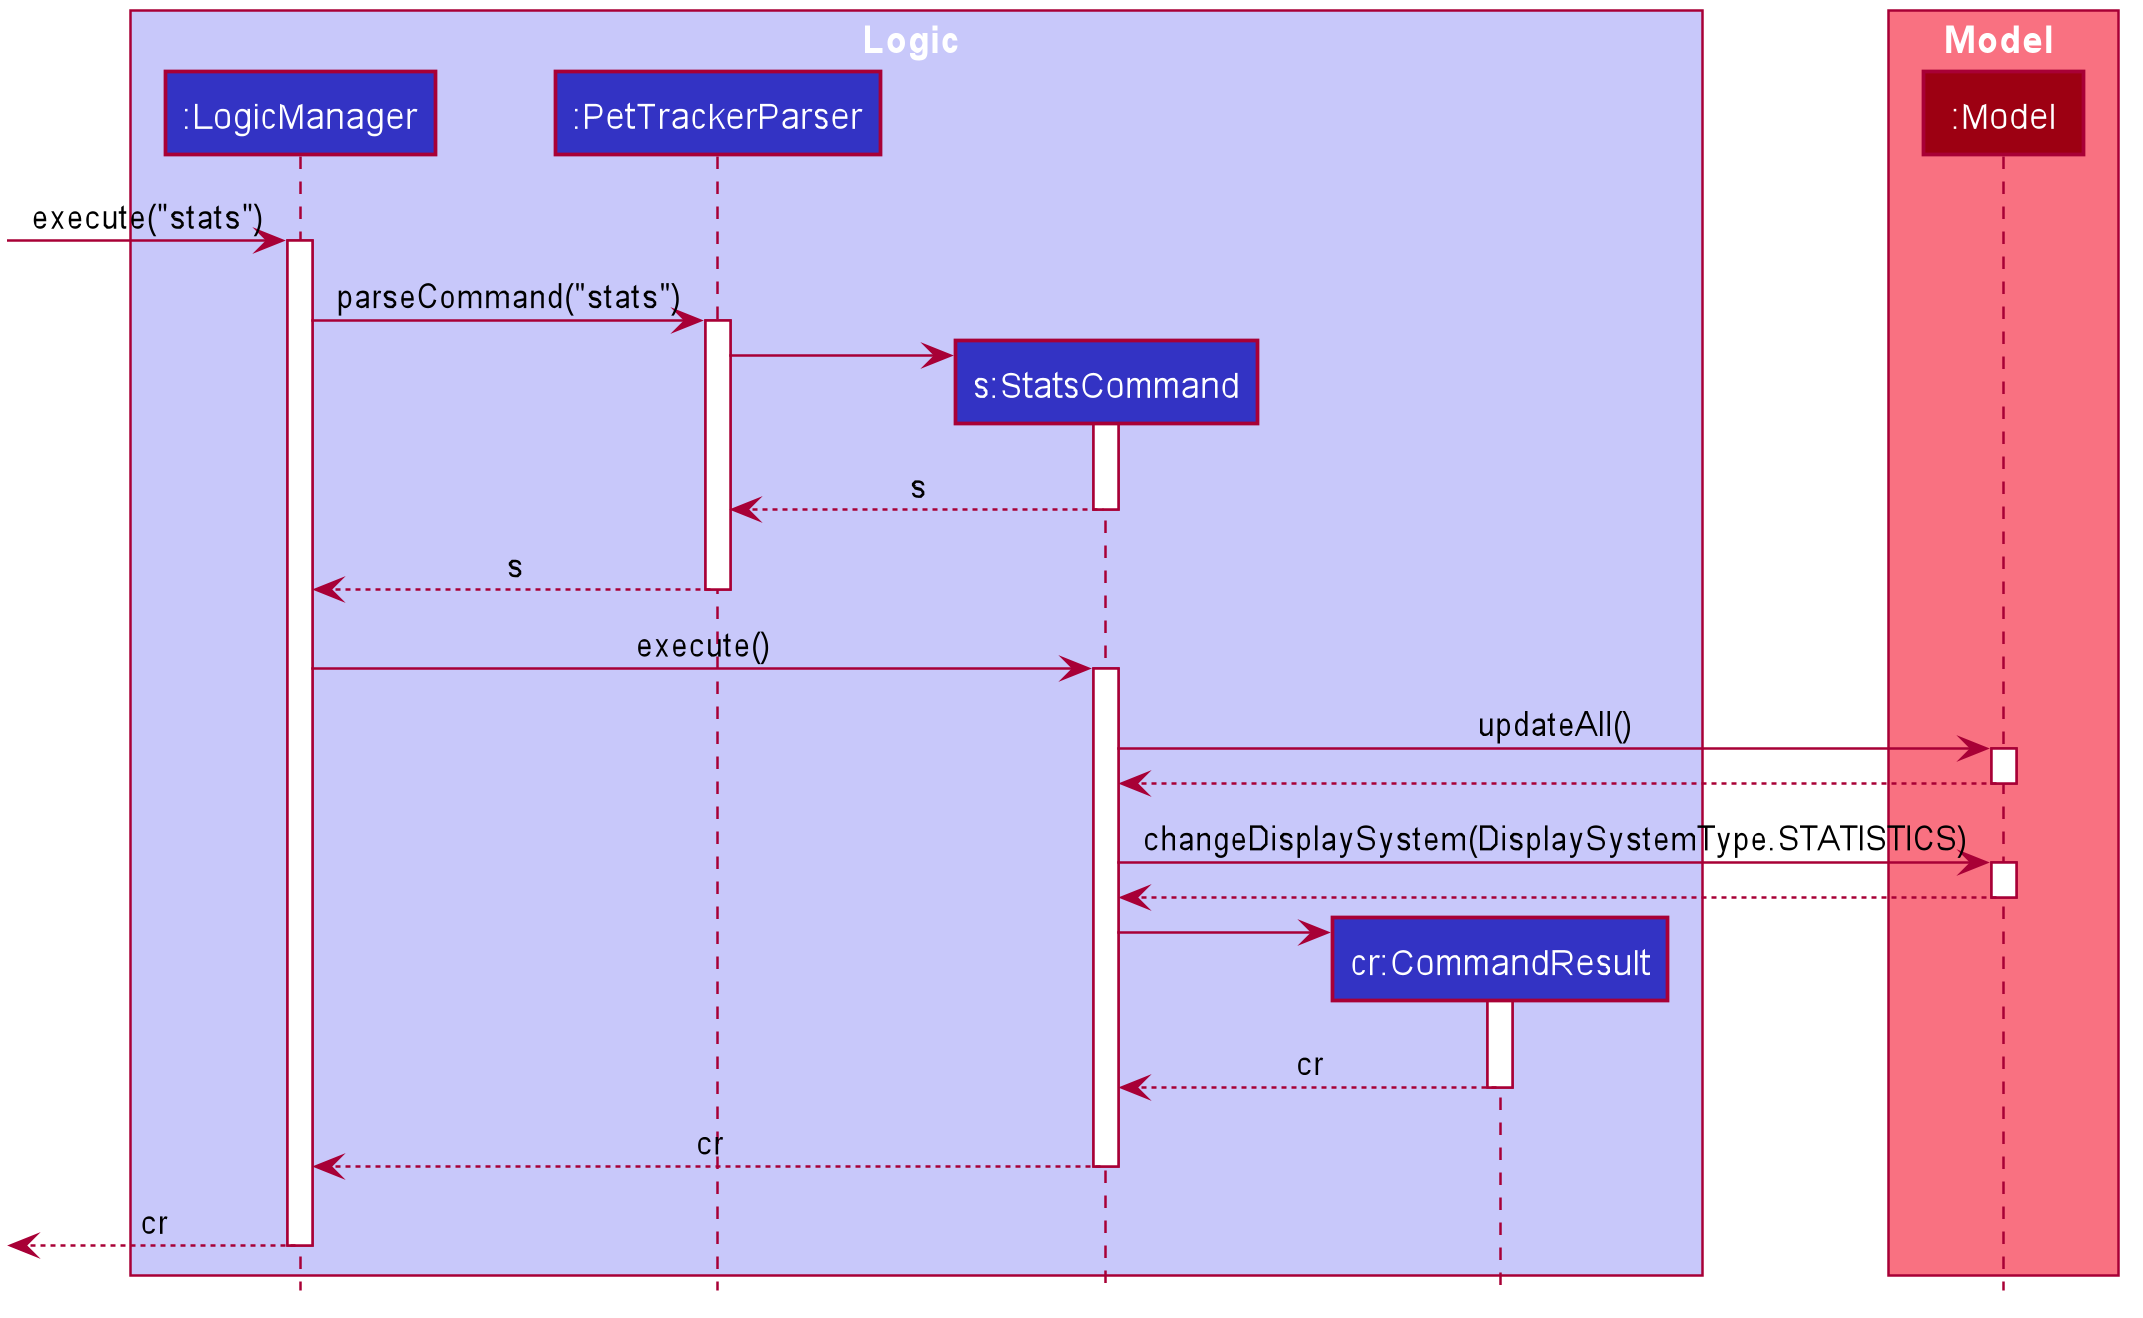
stats Command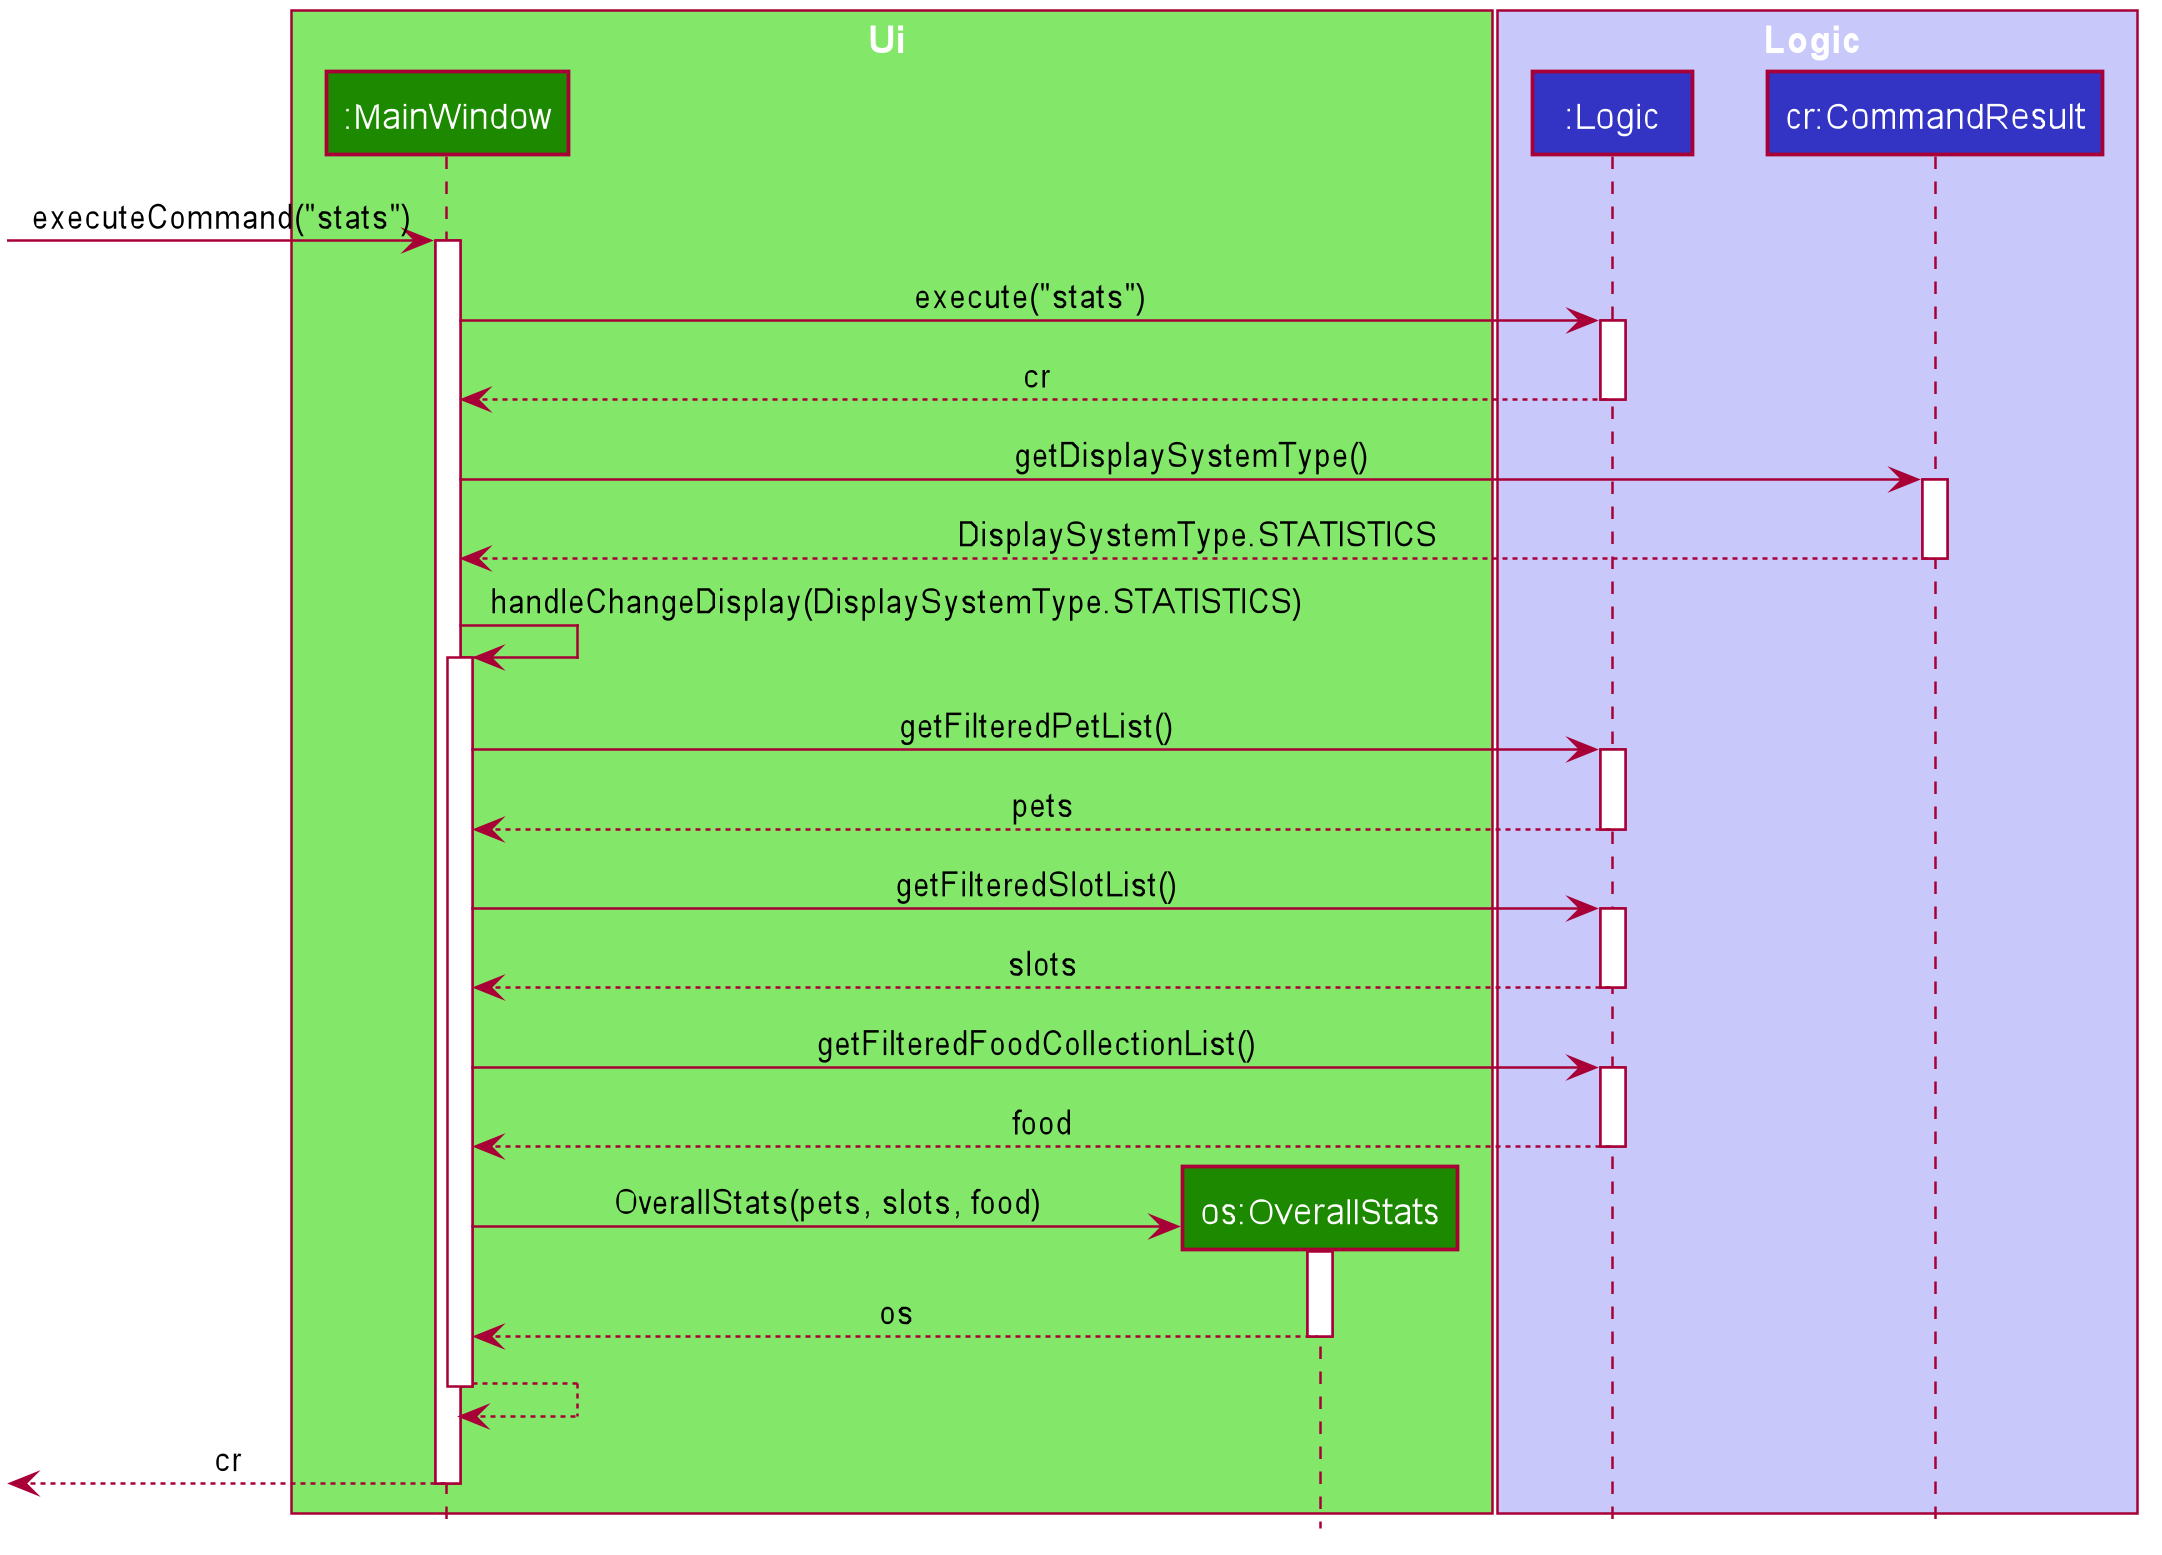
stats Command3.6.2. Design Considerations
Aspect: How to update diagrams when there are changes
-
Alternative 1 (current choice): Refresh the screen
-
Pros: Easy to implement and only need to refer to
modelto get data. -
Cons: Takes time to process the whole lists of data even though there is only one small change in one of the item (pets, slots or foo collection). This approach might be time consuming when the data size is too large.
-
-
Alternative 2: Make use of
Listenerto detect change inUniquePetListand make changes accordingly-
Pros: Avoid unnecessary processing of data. e.g. The diagrams need not be regenerated when there is no change in pet species, pet food, and recent schedule.
-
Cons: More complicated implementation. There might be more coupling between
OverallStatsunder Ui component and Listener class under Model component.
-
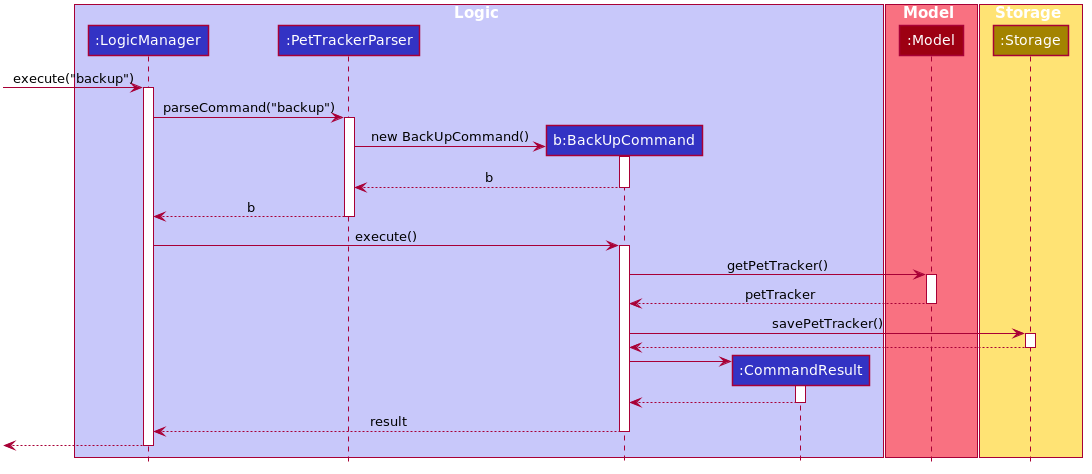
3.7. Back up and load feature
Written by Chen Shenghao
3.7.1. Implementation
The back up/load mechanism is facilitated by Storage.
Storage is extended to implement the following operations:
-
savePetTracker#(ReadOnlyPetTracker, LocalDateTime)— callssavePetTracker#(ReadOnlyPetTracker, Path)after converting LocalDateTime to Path -
savePetTracker#(ReadOnlyPetTracker, Path)— saves pet tracker data to specified path
The back up/load mechanism follows the exact same steps taken when data is saved after each operation and read at initialization. This ensures maximum compatibility and reduces the need for additional code.
backup should never fail unless the saving of data after every operation also fails. For 'load', there are two additional caveats, the specified file should exist and be in the correct format. This is unlike the reading of data at initialization which simply resorts to an empty file instead if these issues occur.
The following sequence diagram shows how the backup operation works:
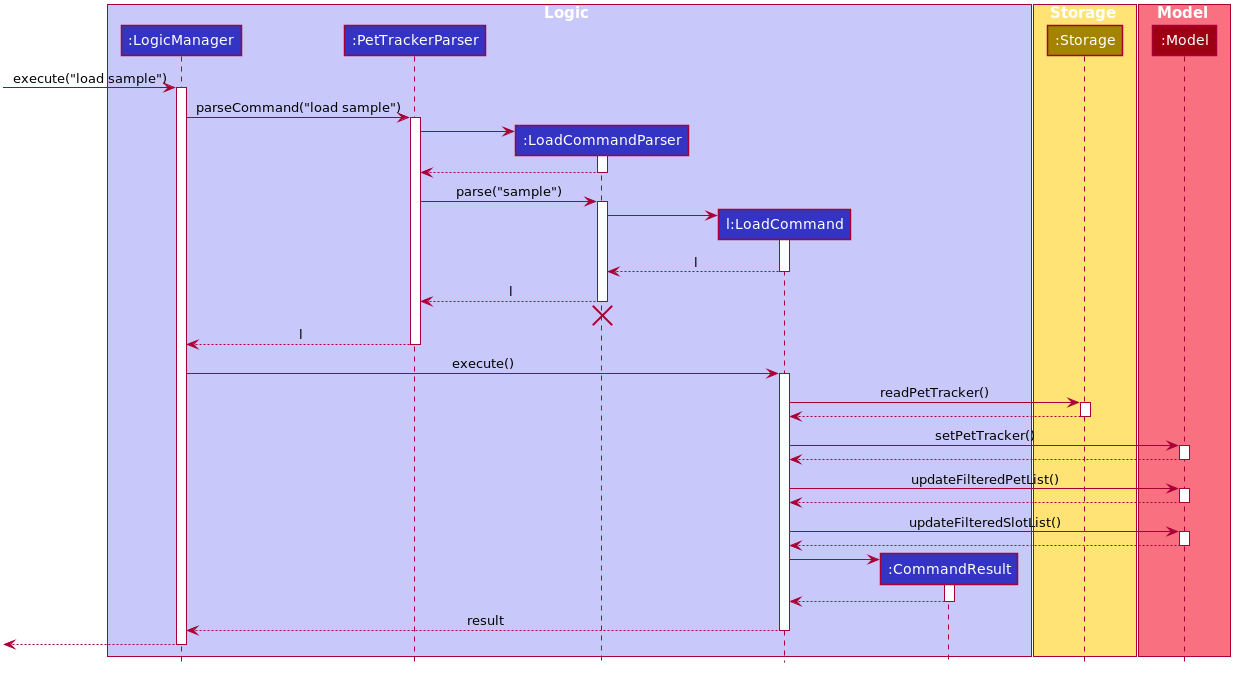
The following sequence diagram shows how the load operation works:
3.7.2. Design Considerations
Aspect: How back up & load executes
-
Alternative 1 (current choice): Executed by Command, following general pattern for Command
-
Pros: Easy to implement, able to rely on established pattern for Command.
-
Cons: Storage is exposed to classes in the
parserpackage, which should not have access to its methods
-
-
Alternative 2: Executed by LogicManager, which already saves data to hard disk after every operation
-
Pros: Storage does not have to be passed to classes in the
parserpackage -
Cons: Requires passing instruction back to LogicManager, actual operation performed after end of Command#execute(), unable to obtain reliable success/error message.
-
3.8. Logging
We are using java.util.logging package for logging. The LogsCenter class is used to manage the logging levels and logging destinations.
-
The logging level can be controlled using the
logLevelsetting in the configuration file (See Section 3.9, “Configuration”) -
The
Loggerfor a class can be obtained usingLogsCenter.getLogger(Class)which will log messages according to the specified logging level -
Currently log messages are output through:
Consoleand to a.logfile.
Logging Levels
-
SEVERE: Critical problem detected which may possibly cause the termination of the application -
WARNING: Can continue, but with caution -
INFO: Information showing the noteworthy actions by the App -
FINE: Details that is not usually noteworthy but may be useful in debugging e.g. print the actual list instead of just its size
3.9. Configuration
Certain properties of the application can be controlled (e.g user prefs file location, logging level) through the configuration file (default: config.json).
4. Documentation
We use Asciidoc for writing documentation.
| We chose Asciidoc over Markdown because Asciidoc, although a bit more complex than Markdown, provides more flexibility in formatting. |
4.1. Editing Documentation
We used Gradle to render .adoc files locally to preview the end results of edits. Also, we downloaded the AsciiDoc plugin for Intellij, which allowed use to preview the changes made to the .adoc files in real-time.
4.2. Editing Diagrams
We used the PlantUML plugin for Intellij to create and update the UML diagrams.
4.3. Publishing Documentation
We used Travis for deployment of Github Pages for publishing documentation.
4.4. Converting Documentation to PDF format
We use Google Chrome for converting documentation to PDF format, as Chrome’s PDF engine preserves hyperlinks used in webpages.
4.5. Site-wide Documentation Settings
The build.gradle file specifies some project-specific asciidoc attributes which affects how all documentation files within this project are rendered.
Attributes left unset in the build.gradle file will use their default value, if any.
|
| Attribute name | Description | Default value |
|---|---|---|
|
The name of the website. If set, the name will be displayed near the top of the page. |
not set |
|
URL to the site’s repository on GitHub. Setting this will add a "View on GitHub" link in the navigation bar. |
not set |
|
Define this attribute if the project is an official SE-EDU project. This will render the SE-EDU navigation bar at the top of the page, and add some SE-EDU-specific navigation items. |
not set |
4.6. Per-file Documentation Settings
Each .adoc file may also specify some file-specific asciidoc attributes which affects how the file is rendered.
Asciidoctor’s built-in attributes may be specified and used as well.
Attributes left unset in .adoc files will use their default value, if any.
|
| Attribute name | Description | Default value |
|---|---|---|
|
Site section that the document belongs to.
This will cause the associated item in the navigation bar to be highlighted.
One of: * Official SE-EDU projects only |
not set |
|
Set this attribute to remove the site navigation bar. |
not set |
4.7. Site Template
The files in docs/stylesheets are the CSS stylesheets of the site.
You can modify them to change some properties of the site’s design.
The files in docs/templates controls the rendering of .adoc files into HTML5.
These template files are written in a mixture of Ruby and Slim.
|
Modifying the template files in |
5. Testing
5.1. Running Tests
There are two ways to run tests.
Method 1: Using IntelliJ JUnit test runner
-
To run all tests, right-click on the
src/test/javafolder and chooseRun 'All Tests' -
To run a subset of tests, you can right-click on a test package, test class, or a test and choose
Run 'ABC'
Method 2: Using Gradle
-
Open a console and run the command
gradlew clean test(Mac/Linux:./gradlew clean test)
5.2. Types of tests
We have three types of tests:
-
Unit tests targeting the lowest level methods/classes.
e.g.clzzz.helper.commons.util.StringUtilTest -
Integration tests that are checking the integration of multiple code units (those code units are assumed to be working).
e.g.clzzz.helper.storage.StorageManagerTest -
Hybrids of unit and integration tests. These test are checking multiple code units as well as how the are connected together.
e.g.clzzz.helper.logic.LogicManagerTest
6. Dev Ops
6.1. Build Automation
We use Gradle for build automation.
6.2. Continuous Integration
We use Travis CI and AppVeyor to perform Continuous Integration.
6.3. Coverage Reporting
We use Coveralls to track the code coverage.
6.4. Documentation Previews
When a pull request has changes to asciidoc files, you can use Netlify to see a preview of how the HTML version of those asciidoc files will look like when the pull request is merged.
6.5. Making a Release
Here are the steps to create a new release.
-
Update the version number in
MainApp.java. -
Generate a JAR file using Gradle.
-
Tag the repo with the version number. e.g.
v0.1 -
Create a new release using GitHub and upload the JAR file you created.
6.6. Managing Dependencies
Project dependencies are managed by Gradle, and are not included in this repository.
List of dependencies:
Appendix A: Product Scope
Written collaboratively, collated by Zhao Mingjian
Target user profile:
-
has a need to manage their pet store with a variety of animals and features
-
has a need to make schedules for pet grooming and ensure no-conflict in the scheduling
-
prefer desktop apps over other types
-
can type fast
-
prefers typing over mouse input
-
is reasonably comfortable using CLI apps
Value proposition: manage pets, pet consumables and schedule faster than a typical mouse/GUI driven app
Appendix B: User Stories
Written collaboratively, collated by Zhao Mingjian
Priorities: High (must have) - * * *, Low (nice to have) - * *
| Priority | As a … | I want to … | So that I can… |
|---|---|---|---|
|
user |
key in a new pet, enter its breed, age, size and food consumption. |
keep track of the pets I have in my store and their details |
|
user |
delete a pet |
remove pets that I have sold or no longer taking care of |
|
user |
find a pet by name, species or tags |
locate details of the pets without having to go through the entire list |
|
user |
keep track of pet food, cleaning products and other consumables |
not run low on items needed to keep the pets healthy |
|
user |
schedule when to bathe my own (in-store) pets |
avoid clashes in bathing schedule |
|
user |
view the schedule and see which slots are available to bathe the customers' pets |
avoid clashes in bathing schedule |
|
user |
see which free slots are available for grooming |
avoid clashes in grooming |
|
user |
view a statistical summary of the pets, stocks and schedule |
handle logistics of the store more efficiently |
|
user |
add photos for the pets in store to illustrate |
easier to make a mental link between the actual pets in the store and the names |
|
user |
keep track of the cost and revenue generated by each pet |
so to buy the more popular ones in next restock |
Appendix C: Use Cases
Written by Zhao Mingjian
(For all use cases below, the System is the PSH and the Actor is the user, unless specified otherwise)
Use case: Delete pet
MSS
-
User requests to list pets
-
PSH shows a list of pets
-
User requests to delete a specific pet in the list
-
PetTracker deletes the pet
Use case ends.
Extensions
-
2a. The list is empty.
Use case ends.
-
3a. The given index is invalid.
-
3a1. PSH shows an error message.
Use case resumes at step 2.
-
Use case: Removing a bathing slot
MSS
-
User requests to show schedule
-
PSH shows schedule of that day
-
User requests of delete a slot at a specified timing
-
PSH deletes the slot
Use case ends.
Extensions
-
2a. There is currently conflict in the scheduling (i.e. One slot begins before the previous one ends), the latter slot is shown in red.
Use case resumes at step 2
-
3a. The given timing does not exist.
-
3a1. PSH shows an error message.
Use case resumes at step 2.
-
Appendix D: Non Functional Requirements
-
Should work on any mainstream OS as long as it has Java
11or above installed. -
Should be able to hold up to 500 pets + items in total without a noticeable sluggishness in performance for typical usage.
-
A user with above average typing speed for regular English text (i.e. not code, not system admin commands) should be able to accomplish most of the tasks faster using commands than using the mouse.
Appendix F: Instructions for Manual Testing
Applied from AB3 by Zhao Mingjian
Given below are instructions to test the app manually.
| These instructions only provide a starting point for testers to work on; testers are expected to do more exploratory testing. |
F.1. Launch and Shutdown
-
Initial launch
-
Download the jar file and copy into an empty folder
-
Double-click the jar file
Expected: Shows the GUI with a set of sample pets and slots. The window size may not be optimum.
-
-
Saving window preferences
-
Resize the window to an optimum size. Move the window to a different location. Close the window.
-
Re-launch the app by double-clicking the jar file.
Expected: The most recent window size and location is retained.
-
F.2. Switching display
-
Change display of the program
-
Prerequisites: Program is pre-populated with the sample data of pets and slots.
-
Test case:
display s
Expected: Program display is changed to show list of slots. -
Test case:
display c
Expected: Program display is changed to show slots in calendar view. -
Test case:
display i
Expected: Program display is changed to show inventory. -
Test case:
display p
Expected: Program display is changed to back show list of pets. -
Test case:
display x
Expected: Program display does not change. Error message shown. -
Other incorrect display commands to try:
display,display I,Display i
Expected: Similar to previous.
-
-
F.3. Adding a pet
-
Adding a pet while all pets are displayed
-
Prerequisites: Program is showing list of pets to (run
display p)-
Test case:
addpet n/Alice g/female b/13/11/2015 s/dog f/Dog Food: 10 t/cute
Expected: A new pet "Alice" is added to the end of the pet list. Details of the newly added pet shown above the list of pets. -
Test case:
addpet n/Alice g/female b/24/12/2015 s/rabbit f/Rabbit Food: 15 t/fluffy
Expected: No pet is added. Error details shown above the list of pets. -
Other incorrect addpet commands to try:
addpet n/Bubbles g/helicopter b/8/10/2015 s/cat f/Cat Food: 15 t/white,addpet n/Bubbles g/female b/78/10/2015 s/cat f/Cat Food: 15 t/white
Expected: No pet is added, with the relevant and appropriate error details shown above the list of pets.
-
-
F.4. Deleting a pet
-
Deleting a pet while all pets are displayed
-
Prerequisites: Display all pets using the
display pcommand. Multiple pets in the display. -
Test case:
deletepet 1
Expected: First pet is deleted from the list. Details of the deleted pet shown above the list of pets. Slots that the pet used to occupy is also deleted. -
Test case:
deletepet 0
Expected: No pet is deleted. Error details shown above the list of pets. Slots remain the same. -
Other incorrect delete commands to try:
deletepet,deletepet x(where x is larger than the list size)
Expected: Similar to previous.
-
F.5. Adding a slot
-
Adding a slot while all slots are displayed
-
Prerequisites: Program is showing list of slots to (run
display s). Program is pre-populated with the sample data of pets and slots.-
Test case:
addslot n/Bob t/6/4/2020 1000 d/60
Expected: A new slot is added to slot list. Details of the newly added slot shown above the list of slots. Because it is the earliest of all slots, it appears at the 1st slot in the list. -
Test case:
addslot n/Cindy t/67/4/2020 1000 d/60
Expected: No slot is added. Error details shown above the list of slots. -
Other incorrect addslot commands to try:
addslot,addslot n/Duke t/6/4/2020 1130 d/60,addslot n/Cindy t/6/4/2020 2300 d/120
Expected: No slot is added, with the relevant and appropriate error details shown above the list of slots.
-
-
F.6. Deleting a slot
-
Deleting a slot while all slots are displayed
-
Prerequisites: Program is showing list of slots to (run
display s). Program is pre-populated with the sample data of pets and slots.-
Test case:
deleteslot 1
Expected: First slot is deleted from the list. Details of the deleted slot shown above the list of slots. -
Test case:
deleteslot 0
Expected: No slot is deleted. Error details shown above the list of slots. -
Other incorrect deleteslot commands to try:
deleteslot,deleteslot x(where x is larger than the list size)
Expected: Similar to previous.
-
-
F.7. View conflicted slots
-
Viewing slots with conflicts
-
Prerequisites: Program is pre-populated with the sample data of pets and slots.
Initial view: On Mon 6/4/2020, there is a single slot occupied by "Gru" from 13:00 - 14:40 (as per the sample data). It is not in conflict.-
Test case:
conflicts
Expected: Program successfully shows no slots with message "0 slots listed!", as the sample data has no slots in conflict. -
Test case:
addslot n/Bob t/6/4/2020 1400 d/60
Expected: A new slot is added to slot list. Details of the newly added slot shown above the list of slots. This newly added slot and the slot occupied by Gru are now marked as "[CONFLICT]" -
Test case:
conflicts
Expected: Program successfully shows only the two slots on 6/4/2020 with message "2 slots listed!"
-
-
F.8. Saving data
-
Dealing with missing/corrupted data files
-
Prerequisites: List of pets is well populated.
-
Test case: changing pet name manually to an invalid name in pettracker.json
Expected: Data is not loaded. Start with an empty Pet Tracker. -
Test case: changing pet name of a slot manually to pet that does not exist in pettracker.json
Expected: Data is not loaded. Start with an empty Pet Tracker.
-